Wednesday, June 22, 2011

Give it your best shot

My Fuji Finepix HS10 is a bridge camera; It is not a full-blown DSLR. When I saw a gorgeous dog playing a fine, energetic game of catch, I knew I wanted a picture.

But wanting and taking are two different animals. With the sun setting I knew my picture of the leaping dog could itself be a dog. I knew it could be ruined by the very action I was trying to capture.

Never let reality stop you from trying. You'll never win if you never play. Always take the picture. You have nothing to lose and everything to gain.

I set my Fuji FinePix HS10 to sports shooting and used the Best Frame Capture setting. Was I lucky? Did I succeed in capturing the leaping dog in the gloomy light of sunset?

I think I was lucky. Not totally successful but I think the picture still works. (Remember, I'm only shooting for the Net. A don't ask a lot of my equipment.) The best part of the night was that I got practice shooting action with my HS10. The next time I see this, hopefully earlier in the day, I'll get a great picture for sure. I promise!

If you can set your shutter speed, set a speed of at least 1/500 second. A setting of 1/1000 is even better for stopping fast action like this. You might need to up you ISO setting and accept a little noise in order to use such a fast shutter speed. Your lens will be wide open but if it is a zoom it may only open to something like f/4.5. If your lens is that slow, you may have problems unless you are will to boost your ISO as high as 6400. Good luck!

Monday, June 20, 2011

Image quality: How much quality do you need?

Had to run a little Lowbanks art before running the boring shot below.
Having worked for many years in the newspaper business, I've learned to set the bar pretty low when it comes to image quality. When pictures are translated into halftones with 100 dots to the inch, a lot of quality is lost. Also, when images are at the mercy of a backshop pressed for time and forced to cut corners to save time and money, those halftones may be of poor quality. And we have yet to consider the newsprint on which the pictures appear: yellow, thin, blotter paper.

Now, I am shooting for the Internet and my images must be reduced to 7-inches at 72 dpi and saved as jpgs in order to ensure they load quickly. I'm still kissing off quality.

Iron arches in the blocks to the right of the centre marten house are not visible.
The above shot of the beach at Lowbanks, Ontario, is 156 KB sized jpg file. If I wanted to make a large print, the enhanced file, from which the Internet file was created, is a massive 28.5 MB TIFF file. It was created from a RAW file captured by my Fuji FinePix HS10. Look at the flag in the middle of the picture and then run your eyes down the flag pole to the breakwall.

Iron arches in blocks are visible.
Do you see some small, steel arches sunk into the concrete blocks just over to the right? No? That's because detail easily seen in the large file has been lost in the small. Pictures destined for the Internet lose a lot of detail.

The image in which the iron arches are visible is a jpg cropped from the full-sized TIFF file. Unfortunately, in order to show you this cropped image I had to jpg it in order for blogger to accept it. The actual file has much more detail, even in the grass.

Recently, I read some posts on the Nothing Special photo blog. I found them inspiring. The author's writing made me think about quality in a way that I haven't thought about quality since art school.

At the newspaper, only one photographer shot RAW. One other photographer experimented with RAW but soon rejoined the jpg shooting group. Because of the image quality loss inherent in the newspaper business, most of us figured there was nothing to be gained by shooting RAW. I believe we were right.

I no longer work for a newspaper. Maybe it is time I started paying a bit more attention to quality. I am experimenting with shooting RAW. I cannot afford a different camera but that will be part of the challenge: How to squeeze the most quality from a bridge camera like a Fuji FinePix HS10 or a true point-and-shoot like my Canon S90?

Sunday, June 19, 2011

Cropping in camera and other tricks

Crop in-camera for photo files that make better enlargements.
Learn to crop in-camera. Short of buying a better camera, learning to crop your pictures as you are taking them is one of the most important steps you can take in improving the quality of your images.

Simple point-and-shoot cameras do not deliver the best quality images. My Fuji FinePix HS10 is especially poor when I am forced to enlarge an image. With my Fuji, blowing up the image is a very apt description of what occurs. Always keep in mind that the Fuji is a bridge camera; It is not a full blown DSLR.

Filling the frame is often enough. Unfortunately, with my HS10 sometimes when I blow up an image I discover soft, smudging areas. This can be visually very annoying. These smeary areas are where the in-camera algorithm for controlling noise has gone a little overboard.

I have been finding that if I shoot important images as RAW files and not jpeg I can skirt some of these issues. Photoshop CS5 Extended has better noise control algorithms than my Fuji. Or I can choose not to eliminate noise at all.

I have been criticized in the past for using Photoshop. Too expensive, I've been told. Well, watch for sales, I say. I managed to buy my copy for about 70 percent off list. Stay alert and maybe you will be lucky, too.

If you click on this image of Fiona, taken with my HS10, the image will enlarge. In the original, non-jpg file, if you took a close look at the buttons on her shirt, you could see that each of her pink buttons has two holes. This image was shot RAW and enhanced in Photoshop CS5 Enhanced. I stayed completely away from noise reduction in enhancing this image.

One other lesson has emerged here. If you intend on making very big prints, save a TIFF file along with any other files you may save. JPGs have their place, and with luck will make good enlargements, but to be safe keep an enhanced TIFF file in the wings ready to send off to be printed.

For Best Quality:
  • Use a DSLR to shoot your pictures. If this is not possible, it isn't for me, then make sure to:
  • Fill the frame when shooting.
  • Shoot RAW.
  • Shoot the largest file size that your camera is capable of shooting.
  • Save the enhanced image as a TIFF file.
  • Stay away from JPG if you want maximum quality.
Click to enlarge. In the original, non-jpg file, one could count the button holes.

Tuesday, June 14, 2011

Full, unenhanced photo from Fuji FinePix HS10.

The image file straight from the camera. Double click to view whole file.

I've read a lot of criticisms on the Web about the quality of the images delivered by the Fuji HS10. The criticisms are valid but one must keep in mind the size and cost of the HS10. I have a poor heart. I'm not going to carry a top-of-the-line DSLR and a couple of high quality lenses everywhere I go. It is just not going to happen.

The Fuji is not a bulky, heavy monster. It is a joy to carry; It is not always a joy to use. It can be slow to react when the shutter is depressed. But, if you've got the patience in most cases you will get the picture.

A program for enhancing your pictures also helps. For publication on the Web, I usually enhance my pictures, resize them to a width of 7-inches with 72 pixels per inch and sharpen before placing them on one of my blogs.

File size reduced, image enhanced and sharpen, and finally posted on Web.
I gave up a couple of fine Canon EOS DSLRs when I left The London Free Press where I was a staff photographer for more than three decades. I confess, I miss those superb cameras and my bag of lenses. That kit was valued at more than $30,000 Canadian.

I can afford to miss that kit; I cannot afford to miss the $30,000 I'd need to spend in order to replace it. If you shoot for fun and are more concerned with your overall images than pixels, you might find the new Fuji FinePix HS20 to your liking.

If you are into ultimate quality and have the bucks to afford to play in the big-boys' sandbox, go to the blog Nothing Special and click on Fuji HS10 near the bottom of the Index to Articles. I don't believe the author of this blog has tested the HS20 at this time.

Shooting RAW may have advantages.
I was surprised that the Nothing Special blogger has been amazed at times by the HS10. He seems a tough critic to impress. That said, I can't see him being too happy using either an HS10 or HS20.

Reading Nothing Special's posts made me look at my pictures with a more critical eye. I've started experimenting with shooting RAW. This, I hope, will keep the in-camera algorithms in check and prevent the blurring and smudging that occasionally mars photos.

The shot of Fiona was shot RAW and reduced in Photoshop for inclusion in this post. The quality of the large image indicated there may be advantages to shooting RAW. For instance, no smudging anywhere of grass blades into a smeary patch of green as happens with jpegs.

Tuesday, June 7, 2011

Watch the light


Photography is about light. No light; No photography.

A stunt favoured by cave tour guides is to turn off all the cavern lighting when the tour reaches the deepest point in the earth. People discover without light, they cannot see — nothing, nada, zilch. The world in an unlit cave is a black void. Encouraged to wave their hands in front of their faces, they cannot see their hands no matter how close to their faces they are waving them.

For many people on such tours, this is the first time in their lives they actually have "seen" total darkness. Total darkness is pretty rare. For this reason, to find a spot where no photography is possible you may have to head for some caves.

If you head for the hills at night, simply bring a tripod and you'll be fine — especially if you have learned to watch the light.

Take today's picture taken in a relatively dark restaurant. To grab a photo here demanded a careful reading of the available light. First, there was some light coming through a wall of windows some distance away. It was nice soft light but weak and made weaker by the time of day — dusk.

The lights on the walls offered a way to backlight some scenes to force subjects to pop free of the background. (So often, in these situations, dark hair simply disappears into the dark background making for ill defined subjects.)

Even with most light coming from behind, I got a shot.
Using a Canon SD90 set to available light photography in a dimly lit environment, I supported my arm and held it in a position such that the wall lights gave a nice glow to the waitress's hair.

I tried to time my picture taking to a moment when both waitress and customer were still. When they were going over the menu, I saw my opportunity. I shot lots, and lots didn't work. Camera and/or subject movement ruined a number of shots. (I used a similar approach to capturing the interaction between the Bud Light Lime crew and a couple in a London, Ontario restaurant.)

Personally, I don't like straight on flash photography. Sometimes one has no choice but to fall back on one's flash for light, but if you can accept the coarseness of high ISO settings and the loss of a fair number of shots to movement problems, learn to watch the light and you will grab some nice unguarded moments.

Tuesday, May 24, 2011

Shooting Fireworks

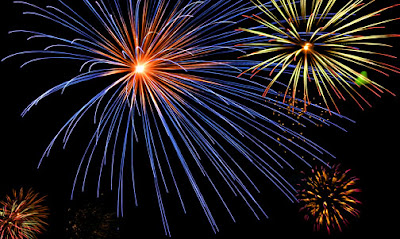
Shot with Fuji FinePix HS10 set to "Fireworks." Photoshop for multiple images.
To shoot fireworks you need a rock solid steady camera and a long shutter speed. An expensive camera is not necessary. A good quality, solid tripod is a blessing, but anything to hold your camera steady will do. Once, while working for the newspaper, I snuggled my camera deep into a big, heavy camera bag and with the lens pointing out and up at the fireworks, I got my picture.

In fact the picture I got wasn't just good but really great. Shooting from such a low angle, with a really wide angle lens, it might have been a 24mm, I captured not only the fireworks but some of the spectators sitting in chairs. I popped a little flash into the picture to add a little detail to the spectators. This was a story picture, a picture of the event, and not just a picture of fireworks.

With a fully manual DSLR camera:

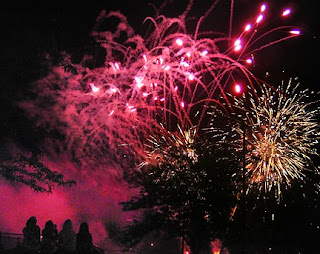
Shot with a Canon SD10 compact point-and-shoot.
First, think picture. Good photographers are creative artists first and skilled technicians second.

Find a good vantage point for your shots. Ideally, you want to capture more than just a burst of colour in a night darkened sky. A picture that addresses the who, what, where, when and why of the event will be the stronger and far more interesting picture in years to come.

My shot of the girls watching the fireworks at a neighbourhood park was shot with a simple Canon SD10 point-and-shoot set to extended night exposure. I found an angle to silhouette the girls against the bright smoke from the fireworks. I was lucky enough to captured three bursting rockets in one shot. Love it!

Here in London, the fireworks are sometimes launched downtown over the forks of the Thames River. The obvious picture here is a huge, colourful burst or two with colourful reflections in the water below. If you can find and angle to show a few tall downtown buildings in the background, all the better.

With picture thinking out of the way:

  1. Ensure the camera is rock solid. Any movement during the exposure will ruin the picture. Obviously a good tripod is the easiest answer. Anything less can lead to frustration. Sometimes, in a pinch, you will be able to find a support for your camera at the event but this is not to be counted on.
  2. Choose a focal length to match your vision but be prepared to change this during the show. Wider is usually better than longer for capturing the context of the event. Telephotos will fill the frame with exploding fireworks.
  3. Set your focus at infinity. You will always be quite a distance from any major fireworks display.
  4. Set the aperture. I usually start with f/8 and stop down to f/11 if necessary. Remember, f/11 lets less light into the camera than f/8.
  5. Set the shutter speed to "B" for bulb or time exposure. With the shutter set to "B" you can depress the shutter button a moment after hearing the boom of the fireworks rocket launching. This way the shutter is open when the display starts. Keep the shutter button depressed until the burst begins to fade. This may be three or four seconds. If the bursts are coming quickly, one after another or overlapping, try holding the shutter open long enough to capture multiple bursts. If you find that you are causing the camera to move during the exposure, try using a cable release. With a good, solid tripod, a cable release is rarely necessary.
  6. Set the ISO. This does not have to be high. I have had good result shooting from ISO 100 to ISO 400. Fireworks are incredibly bright. High ISO settings are not necessary and may result in overexposed and/or grainy, images.
  7. Don't use your flash, in most cases. It will do nothing but possibly burnout the nearby foreground with overexposure. If your flash is built-in, turn it off. (This doesn't mean you can't experiment. You're shooting digital; You've got nothing to lose.)
  8. Check your images as you shoot, making sure the bursts are not out of frame. If you have a zoom lens, you can tweak the focal length if necessary.

To summarize:

  • Find your vantage point.
  • Mount your camera on tripod and frame your shot.
  • Choose the focal length of your lens.
  • Set the lens to infinity.
  • Set the aperture - f/8 is a good start.
  • Set the shutter speed - "B" or time exposure is best.
  • Set the ISO. ISO100 often works. Do not use an ISO higher than 400.
  • Turn off your flash, if necessary.
  • Check your images as you work.

If you have a point-and-shoot, your options are limited and they change from camera to camera. You still need a good tripod but after that you may be at the mercy of your camera. My Canon SD10 had a long, nighttime setting that was excellent for shooting fireworks.

Dedicated fireworks setting: Fuji HS10
My Fuji FinePix HS10 actually has a dedicated "Fireworks" setting. I find the HS10 chooses a time exposure that is a little short but it does work. I may try shooting fireworks using the HS10 in manual mode next time.

And if you don't mind altering reality a bit, you can always take your pictures into Photoshop or another photo enhancement program.

Red Rock, Ont.: Fireworks shot out a bathroom window. No sturdy tripod.

Sunday, May 22, 2011

Unenhanced vs. enhanced photos

I always print my digital images. I grew up printing my pictures in a darkroom and feel very uncomfortable not "printing" my digital images in my electronic darkroom: Photoshop.

The first image is an unenhanced grab shot of a number of goslings cuddling together to protect themselves from a cool, spring breeze. I racked the lens on my Fuji FinePix HS10 well out and shot the goslings with the camera handheld. Double-click to see the image full sized.

Unenhanced image as it came from the camera.
The second image has been taken into my electronic darkroom, Photoshop, and has had the white point set, the contrast has been tweaked using Curves, a little colour correction has been applied and then the colours have been saturated just a little. Finally, the image has been sharpened.

Enhanced image.

Whether you like what I did or you don't, it is clear that what the camera gives you is not the final say. Remember, the colour and the contrast delivered by the camera is not always dead on accurate. Photographers have been burning and dodging since the dawn of photography. There is little reason to stop now.

Clicking or double-clicking the above images should give you the larger, full-sized images.