Monday, December 17, 2012

Shooting action with a point and shoot

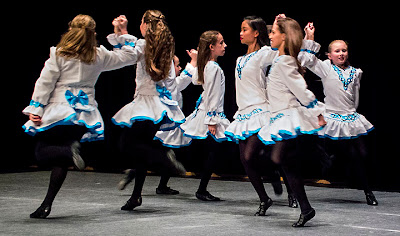
For me, the little dancer in the middle of the image  makes the picture.
I think of my Fuji FinePix HS10 as a glorified point and shoot. It appears, at first glance, to be small version of a DSLR but it is more illusion that fact. Oh, it has some nice features, I love the manually controlled zoom. It works just like my professional zoom lenses from my days as a newspaper shooter. But the oh-so-slow lens is a killer — a picture killer.

If you are like me, too poor to afford a complete DSLR kit, a couple of point and shoots can work just fine but you have to make some concessions. You've got to accept that you will have a high failure rate when it comes to taking pictures under difficult conditions.

Something that most folk forget is that action is not constant. If dancing girls are hopping about a stage, there is a moment when they are neither hopping up nor down. Action stops while the direction of the action reverses. Capture this peak moment and even a slow shutter speed will yield a picture.

Capturing the peak moment is easier said than done. I find with my HS10 that if I use the continuous shooting mode I increase my chances of hitting this action-capturing sweet spot.

Link the use of the continuous shooting mode with shooting moments when action has actually stopped is an even better way of guaranteeing an image. For instance, with the dancers there was a moment at the end of every reel or jig when the girls took a pose before bounding off stage. These poses made for perfect moments for maximizing the chance of capturing a quality photo.

One nice thing about posed shots is the quality; It is good enough quality to make acceptable prints. When images are presented online, they do not need the resolution demanded by images being made into prints.

If you are sacrificing movement in order to get a good image, watch for images with other features that can give the picture visual punch. Colour is a good thing to watch for. Splashes of colour almost always add to the appearance of a picture on a page.

Shooting a dance performance, inside on a stage, can be difficult when using a point and shoot. But, it is not an impossible situation. But, if there is one dancer, a daughter or granddaughter that you simply must have in a picture, go for the posed shot.

Saturday, December 8, 2012

Use "motor drive" with your point and shoot

Firing at wide angle maximizes the f/stop in use.
 O.K., it's not quite a motor drive. But, holding the shutter button down on many point and shoots will give a continuous burst of shots at a subdued speed — more like an old fashioned camera winder than one of today's super quick motor drives. Still, even a humble winder has its place.

My Canon S90 (the Canon S110 is the replacement) has an f/2.0 lens when used wide open. This demands shooting at wide angle. As the lens is zoomed it loses maximum aperture size. Shooting at wide open with the lens at wide angle, set the camera to available light photography. You want natural looking images taken without a flash. Most folk prefer the look of available light over harsh on-camera flash.

The school gymnasium where my granddaughter's Christmas pageant was held was somewhat dark, at least for photography. The shutter delay on my point and shoot struggled to focus and this meant lost pictures.

In situations like this I have found waiting for picture moments and then simply laying on the shutter button works wonders. Line up your shot, or anticipated shot, and then when the moment is right start firing. With luck you will grab an image with minimal subject movement. (I know you will hold the camera steady and keep camera movement to a minimum, right?)

As this was a picture moment, the potential for capturing a good image is there. Unfortunately, the slow shutter speed necessitated by the available light approach dooms many of the images. But, with my system you will have choices and a few of those choices may be just what the (photo) doctor ordered.

Points to remember:

  • Wait for a picture moment.
  • Shoot at wide angle to maximize the f/stop in use.
  • Keep the shutter button depressed to fire off a series of shots.
  • Hold the camera steady. If possible, brace the camera. 
  • Use a very large SD card. You don't want to fill your card during your shoot.
  • View your pictures at the soonest possible moment; Enlarge the best ones to ensure you've got your picture.

Wednesday, September 26, 2012

Not quite a silhouette


Not enough light? Before turning to your on-camera flash, consider shooting a silhouette or even simply shooting an image that is darker than your usual.

I "printed" this with the background a little darker than in the original file. Now that I am viewing the image on a "page," I am not completely pleased with my work.

I think the image would have more punch if the back lit pink crown was more blown out and the pink fairy wing were brighter. The second image is posted below. What do you think?


Saturday, September 1, 2012

Forced to use slow shutter speed, panning offered solution

Panning can capture subject movement.
Recently I visited Montreal, and while there I visited the Biodome. The exhibit made the news recently with the survival of a baby lynx, one of three, born to a captive Lynx that calls the dome home.

It's seems bright enough in the dome until one tries to take a picture of a moving lynx. Today's slow lenses in our point and shoot cameras have very small f/stops even when used wide open. These lenses demand the use of very slow shutter speeds in dimly lit indoor situations. A slow shutter speed, as you know, will not stop action. A blurry image is the result.

Panning is one way to squeeze an image out of a situation like this. Focus on the moving subject and pan, follow the subject with the camera. Squeeze off your shots carefully trying not to jar the camera. With luck, the feet and legs will be rendered as moving blurs of motion while other parts of the subject, such as the head in this case, are captured with an acceptable amount of sharpness.

My shot of the lynx was shot at 1/10th second at f/5.6 using and ISO of 800. I think it works. Sadly, I'm not sure the Biodome works for the lynx. The mother's constant pacing suggests stress.

Other animals in the Biodome environment looked quite happy. They were content. But I did not get a feeling of contentment and happiness from the clearly agitated lynx.

Wednesday, August 22, 2012

Little story additions make a big difference

Click on image to see expanded view.
What makes one picture better than an other? Clearly colour, composition, subject matter and quality of the image all enter into the equation. One often ignored quality is story telling. The richer the story told, the better the picture.

I've shot a lot of pictures of bees but I have never been able to show the pollen carrying sack as clearly as I did with today's image. For me the burst of colour, the placement of the bee, the clarity of the image and the story-telling mass of pollen carried on this bee's leg all work to make this one of my best bee images ever.

Monday, July 23, 2012

Photoshop or soft focus filter? Which is best?

The unsoftened image can be found here.

Back in the days that I shot film for the local newspaper, I played around with soft focus images. Soft focus does not mean out-of-focus. A true soft focus image is a blend of sharp image and a soft one. Soft focus images glow, the highlights may bleed into the surroundings, but these images have a sharpness that gives them the punch missing from simple blurry shots.

Some photographers used to try and produce the soft focus effect in the darkroom. This method didn't work well. One works with a negative in the darkroom with the result that the shadows bled into the highlights. For instance, bright teeth (high key areas in an image) were darkened by the bleeding of colour or tone from the surrounding areas.

I found that a Nikon Soft Focus No. 1 filter screwed onto the front of a lens worked best. These filters were perfectly clear with a pattern of diffusing dots scattered over the filter surface. The result was a Nikon sharp image with a soft glow. It was a very nice effect.

Now that I am shooting digital, I thought I'd like to try recreating the soft focus effect using Photoshop. I searched the web for ideas and tried a lot. They all, for one reason or another, failed to deliver the look I was searching for.

Then I found one site that had a method that was pretty good. I felt it produced a fine look that one could confuse, if one didn't look too closely, with the results achieved using the old Nikon filter.

Not one to rip off another blogger, here is link to the site with the soft focus effect instructions. Enjoy.

Link --- Soft-Focus Emulation in Photoshop

Monday, July 9, 2012

Kaleidoscopes for pictures with a '60s feel


Photography is about fun. Kaleidoscopes are about fun. When I found one of the cardboard toys in my basement on the weekend I immediately wondered what would happen if I tried to shoot pictures using the old thing.

When playing with stuff like this remember to try different lenses. For instance, I found that I got the results I was looking for with the kaleidoscope when using my lens zoomed to 105mm. The wide angle rendered an image trapped in a black circle. If you can control the f/stop, play with this, too.

The toy of the psychedelic generation pumped out some really neat shots. I learned that if you have an iPhone, there is an app for taking pictures that emulate my kaleidoscope. Check out Kooleido for your iPhone, if interested.

And of course, there is always Photoshop. For high quality results, Photoshop may be the best answer. Start with a fine quality image and let the software take it from there.

Still, there is something cool about using the real thing. It's a fun blast from the past.