Tuesday, December 27, 2011

Sometimes a picture is served with your dinner

For the recipe, please follow this link: Judy's broccoli and cheese soup.
Recently I was reading a humorous piece on what it's like to be married to a photographer. One item drew my wife's attention: one must accept the fact that a photographer, significant other rarely eats a great meal while it is still hot. They are too busy shooting pictures of the meal!

My wife read this and smiled.

The picture with today's post was quick and easy. Light was supplied by a large window in our kitchen dining nook. The attractive china and flatware were simply my wife's choice for use on Boxing Day. The red background is simply the plastic, placemat. The camera was a Canon S90 set to the automatic, available light setting.

This all went so quickly, I still enjoyed my soup steaming hot.

Note: This image would not work professionally. The reflection of the photographer in the spoon ruins this for professional use. A simple white tent of some sort to hide the photographer and supply a clean, white surface as the reflection is called for. With the help of an assistant, two dish towels can be held taut above the subject, with the camera lens poking between the towels to capture the image. The camera lens can easily be removed later in Photoshop and the harsh white of the dish towels subdued.

Saturday, December 10, 2011

Better or worse? You decide.

Copyright: Robert Abell
Recently I saw the above image shot and posted to the Web by my nephew. I really like his work and I like this image but, to my eye, it had a cast: a red or deep pink cast. Look at the cement. On my monitor the cement appears quite pink.

I took the image into Photoshop and using the grey eyedropper tool in Curves, I tried to neutralize the red cast. Using the eye dropper set to sample a three by three pixel area, I clicked on various areas of the image that I believed might well be a neutral grey. When I thought I had the red just about gone, I tweaked the individual colour curves to remove any linger remnants of errant colour. What do you think? Is the picture improved or weakened?

I find that correcting the colour even makes the detail in the young woman's sari pop.

Copyright: Robert Abell

Wednesday, November 30, 2011

Family visits and memory photos

My nephew is a perfect example of the "be there and be ready" kind of photographer. He is not big on equipment. His camera of choice at the moment is a Canon PowerShot, G series. The quality is good. I have no complaints with the images I have seen.

The strength of his camera is not its ultimate quality but its small size. If he sees a picture, his camera is always handy.

Family visits are a great time for seeing pictures. If you haven't seen each other recently, there is that new-moment quality keeping one's eye alert.

When his niece, not yet three, figured out how to get a drink from the public drinking fountain, my nephew grabbed the picture. He captured the memory. Nice.

Later, he watched as his uncle's granddaughter, just more than two years old, did some serious wall climbing. The wall was the uncle. The picture was great. Oh, those who worry about ultimate quality would not be happy. The light was poor and the image is grainy. If you fall into that group you will not be impressed. My guess is that the naysayers are in the minority.

I love the little girl's confident expression as the little girl climbs up her grandfather's chest to a height of more than five feet.

Grandpa is holding the child by her arms and not her wrists. There is more care being taken here than one might think.

My nephew is an architect and when his uncle and the granddaughter began building a tall "castle" together, this was sure to build to a picture moment. It did.

One can quibble over the angle; It might have been an even better shot if taken from a spot a little to photographer's left. This would have put granddad completely in the picture.

But we must remember, we are capturing family moments, not perfect images for the National 'G'. In a family photo album, this image is a ten.

Note: my nephew is NOT using his camera's build-in, straight on strobe. This is good, in my opinion. I will take available light over flash almost every time. It helps to keep the feel of an unstaged moment with subjects unaware of the camera.


Sunday, November 13, 2011

It was a firing offence.


When I worked as a photographer at a newspaper, we had a rule: If it couldn't have been done in the wet darkroom, we were not to do it in Photoshop. Messing too much with pictures was a firing offence.

Get it right when you're shooting it. Distracting backgrounds and off balance compositions have to be eliminated in the shooting and not in Photoshop. Get caught taking something out of the background and you might well find yourself being taken out of the newsroom.

That said, outright lies in photographs were quite another matter. The chain that owned the paper for which I worked saw nothing wrong with using models in news photos; The paper I worked for saw this as a travesty.

Which brings me to today. I am now shooting with a Fuji HS10. It's slow. The shutter lag can be a killer. It can be awfully hard to get the composition just so. Today's image had too little water at the bottom and was a little shy on the left, too.

I took the image and, using content aware in Photoshop, I added extra water on the bottom and left. The picture looks better but is it still an honest picture? Doing what I did is sorta creative but does that allow this to slip by under the umbrella defence of art? It is hard to take too much credit for the craft, that credit goes to the software writers at Adobe.

I know if I still worked at the paper, I would leave unbalanced swans alone. Is this still a good rule? My gut feeling is this question risks stirring up a lot of unbalanced critical comments.

It was a firing offence: Part Two

Newspaper photographers are not supposed to manipulate images. They are allowed to adjust the tonal range, make blacks black and whites white, but this is not seen as manipulating the image. This is just making a good quality print.

But the day could have been flat and the dull-toned image might be accurate. Still, it was O.K. to change contrast. In the wet darkroom it was as easy as changing the paper grade.

Please check out the following link to the well known Pulitzer Prize winning photo by John Filo showing a kneeling, young woman screaming over the body of a fallen student, one of four killed when National Guardsmen fired in to a crowd of demonstrators.

Note the missing fence post above the young woman in the image taken from Life magazine. It is stuff like this that my old editors were trying to prevent. But today, with the ease that Photoshop can alter an image, almost seamlessly, adding water to a picture, water that is in fact there but cropped out by the camera, can get oneself into the deepest of job-threatening, doo-doo.

Newspapers and news magazines like National Geographic don't need to be defending their images. The National G. knows first hand how yielding to the temptation of improving an image in Photoshop can lead to red-faced embarrassment than can't be as easily Photoshopped away.

The National G. once was caught moving the pyramids and another time was accused of adding water to an image in order to use a horizontal image in a vertical format on the magazine cover.

The technology has made the modifying of images very easy and very tempting. If you work at a newspaper, the Devil uses Photoshop. Take care.

Monday, October 24, 2011

Memory Colours

Took two shots, then wind blew away the yellow leaf.
When I worked at a daily paper, one of my responsibilities was preparing colour separations for publication. I learned that sky blue, grass or foliage green and some other colours such as tomato red are memory colours. Oddly enough, memory colours vary from culture to culture. For instance, I was taught that North Americans like their memory colours, especially sky blue and foliage green, more vibrant, more saturated than Europeans.

I don't know whether or not this is completely true but I do know that brightly coloured pictures in the paper were received better than dull oneseven though the dull ones might have more accurate. When I think of fall, I think of incredible colours. Impossible colours. Like the colours in today's photo.

This image was shot RAW and punched up before being converted to a jpeg. Then it was taken into Photoshop and posterized before being saved. (Image -> Adjustments -> Posterize...) When doing stuff like this to images, always keep a copy of the untouched original. The bold look you like this year, may simply look cheesy next year.

Wednesday, October 19, 2011

Point-and-shoot zooms have changed photography forever


When I got into photography my camera had a fixed lens. Then, in the '60s I discovered the single lens reflex camera and ordered a Pentax Spotmatic from Asia Photo Supply in Hong Kong. I can still recall the excitement when a large, wooden crate arrived with my new gear. I had a 28mm lens, a 135mm lens and a 300mm lens.

But because it took a crate to carry all that stuff, I often didn't have all that stuff with me. Often, I was back shooting with one lens.

Today, almost every point-and-shoot has a zoom lens and many have lenses capable of emulating my entire camera kit from the '60s. The pictures today were taken with an older Canon S90 but they could have been shot with any one of dozens of little cameras.

For the dandelion picking picture, I set the lens to wide angle. For the shot of Fiona enjoying a high-flying ride on a swing, I set the lens to its longest setting. For the picking dandelions shot, I wanted to see some context. I wanted to see the little girl surrounded by grass with the suburban neighbourhood in the distant background.

For the swing shot, I wanted to try and show the flying, mane of red hair and the child's reaction to being pushed hard, fast and high. The long lens setting allowed me to fill the frame.

What is important here is to capture the moment just after she has reached the highest point and is beginning her return. Stopping action with point-and-shoots can be difficult. If you nail the shot at the instant the little girl is changing direction, you will have a tack sharp picture but the flying hair won't be flying. But, if you wait too long to shoot , she will very difficult to frame properly. Set your zoom to a long lens setting, I used 105mm, and be sure to shoot lots.

Wednesday, October 12, 2011

A shot in the dark


I shot today's photos with my Canon S90, a model that has now been superseded by the Canon S95.

The little point-and-shoot had two features that attracted my attention. One, it had an f/2.0 aperture available when emulating a 28mm lens on an SLR. This f/stop lets in twice as much light as the more common maximum aperture of f/2.8.

Two, it has a little trick up its sleeve that allows it in dark, picture-taking situations to treat two adjacent pixels as one. This ups the light sensitivity of the camera while cutting the photo file size in half. If all you want are snap shots, this is a good trade-off. When set to low-light, the camera also turns to a brute strength strategy and ups the ISO rating in use.

When I saw my granddaughter, Fiona, sitting with her grandmother, both engrossed in a television program, I thought picture. The light was poor; It was night. But with the camera steadied against the television stand, I squeezed off some shots. I should take Judy into Photoshop and brighten her face a little but overall I'm happy.

Later, I caught the little girl running up and down a "stone" path she had constructed through our kitchen using place-mats. Again, I grabbed my Canon S90, set it to low-light level photography, braced the it against a chair, and shot away.

Personally, I like the low-light level shots better than the ones illuminated by the little camera flash. The colour in the picture may be off a bit and there might be more grain or noise marring the image but it has the feeling of the moment. I have a personal hatred for direct, harsh, on-camera flash. Deciding to shoot available is not a difficult decision for me.

Don't let low light levels stop you from taking pictures. Make sure you have a camera eager to take a shot in the dark.


Saturday, October 1, 2011

One example of enhancement correction

In my last post, No tripod? No problem, I mentioned that the images were posted without colour correction. I believed that a little time spent in Photoshop might improve the flesh tones of the little girl and remove the overall blue colour cast in some of the images.

Here is an example of what I was referring to.

Enhanced.
Not enhanced.
The enhanced image has had the colour warmed in Photoshop using Curves to add yellow and remove a bit of cyan. The contrast was pumped up a little using Levels. The picture has not been saturated.

No tripod? No problem.


It is dark in our living room for available light photography. My little Canon PowerShot S90 needs every bit of help it can get. One easy way to make pictures in these situations better is to use a tripod to steady the camera; This removes camera shake from the picture-taking equation.

To steady a camera, one may immediately think tripod or monopod. But often something a lot less official will not only do but do wonderfully. For shooting these photos of my granddaughter, Fiona, I steadied my point-and-shoot on the front of Fiona's yellow, toy bus.

This had the advantage of providing quick sideways movement to frame the picture. The little, toy bus has wheels, a tripod or monopod doesn't.

To show what is possible, I posted these pictures without any enhancement other than cropping plus sizing and sharpening for Web display.

The creativity involved in taking a picture doesn't stop with the camera.


Saturday, September 24, 2011

A better camera would capture a better picture


I loved the look of my niece's dog taking a break from all the company. The light seemed right: Soft with a hint of direction resulting in nice highlights and there were subtle catchlights in both eyes. What could go wrong.

It is times like this that a DLSR looks good. The better quality lenses on DSLRs would make this picture snap in a way that my simple Fuji FinePix HS10 can't.

On the other hand, I can't afford a DLSR accompanied by a small case stuffed with interchangeable lenses. Also, with my failing health, carrying a bulky and weighty bundle of camera gear with me all the time is out of the question. The HS10 with its super zoom answers my needs.

So, I find myself grabbing my Fuji bridge camera, lying flat on the floor, bracing the camera and my hands against the carpet and squeezing off a couple of shots before the mutt decides he's not a model and stops posing.

When I was shooting pictures for my living, this quality would have been questionable but still acceptable; Hey, I worked for a newspaper. I'm no longer shooting pictures for money but for fun and simple cameras supply fun at a price I can afford.

When buying a camera buying one you can afford is always a good idea. Remember, if you shoot a lot, it is just a matter of time until you drop your photo buddy. I've dropped my HS10 a number of times. I'm getting old and clumsy. If I were to break my HS10, I would shed fewer tears than if I dropped an expensive lens or a pricey DSLR. Replacing my HS10 would hurt, but it wouldn't break me.

No matter what camera you use, always try and capture that that attracted your eye in the first place. If your lens isn't long enough to crop the image in the camera, crop the picture afterwards. The only caveat is to make sure the new, cropped shot is still a large enough file to make a good image when printed or displayed on the Web. (Images for making prints require from 150 dpi up, check with your printer; While images for Web display can get by with 72 dpi. And smaller files load quicker; Another reason for keeping Web files small.)

Sunday, August 14, 2011

Colour, Shape and Moment


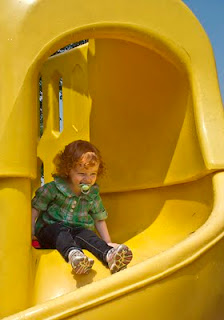
When I saw the circular slide I was hesitant to let Fiona use it. It's too long, too steep, I thought. But a young mother who was watching her child at play noticed and instructed me in a very firm tone, "Let her."

Hey, what does an old geezer know? I went with mom's expertise and told Fiona to go, and she did. "Whee!"

I didn't get a picture of her first time sliding down a tubular slide but I soon had a chance and I took it. Brightly coloured plastic, great shape, laughing child. Put all this together properly and you've got a picture.

This image can be made even stronger by cropping off the holes on the left side. This moves Fiona father away from the centre of the image. This crop also removes the distraction in the lower left corner, putting more emphasis on the child.

Note the quality: This is a resized and cropped image from a larger image saved as a jpeg.

Although I have had problems timing action when using my Fuji FinePix HS10, it all came together for this image. The long zoom lens makes framing images such as this very easy. The picture was shot as a RAW file and some minor changes were made in Photoshop before saving the shot as a jpeg.

Also notice how the line of the diagonal line made by the slope of the slide runs to the lower, left corner of the image. I'm partial to this style of crop and try to achieve this in the camera whenever possible.

You don't have to imitate this but you should try to crop in the camera as much as possible. With point and shoot cameras, the less after-shooting-cropping the better. Point and shoots do not have the ultimate quality of SLR cameras. The files from cameras like the HS10 suffer when cropped, especially if they must be enlarged to bring them back to their original size.


Wednesday, July 20, 2011

Shooting Food


Shooting good shots of plates and platters filled with of wonderfully prepared delicious cuisine is a lot easier than many food photographers would have you believe.

The first step is finding the proper subject. For this you may not have to look any further than your favourite diner. Go early in the evening while the sun is still shining, sit near a window and voila, you're ready to rock 'n' roll.

For creating a smashing food shot, I look for the same stuff that makes the food itself appealing. A nice mix of colours, textures and shapes plus an eye-catching composition. Like I said, all the very stuff that makes a meal memorable also makes a food photo worth taking.

By sitting next to a window you will have eliminated one of the big problems encountered while shooting food: Poor light. Unless you are trying for effect, warm incandescent or cool green fluorescent lighting can destroy what promised to be a fine food shot. Shoot under soft, clean daylight delivered through a non-tinted window and your whites will be white and all your colour vibrant and clean.

Next, try and keep the ISO setting low. You do not want coarse noise to detract from your image. By shooting at a low ISO and choosing a small f/stop - something that gives a lot of depth of field like f/11 - you will capture lots of that all important detail. You do not want to miss the texture on the mash potato patty or the the small specks of spice enhancing the colourful vegetables.

This means that you may need to contend with a slowish shutter speed - like 1/15th of a second. A simple, pocket tripod may be necessary for the best results.

And shoot fast. The food will be at its best the moment your server places it in front of you. And if you are shooting your partner's food as well as your own, your partner will be at his/her best at the moment the food arrives. Take too long getting your shot and both your partner and the food will grow stale.


For more about the food in today's post see: London Daily Photo.


Sunday, July 10, 2011

Get those knees dirty

Getting down low, knees in the dirt, yielded this shot. Nice, eh?
I used to tell my students, "If your knees aren't dirty, you are not chasing all the picture angles. Get those knees dirty!"

Saturday was PhotoCamp London 2011. The last part of the morning was a PhotoWalk. I watched as a woman, Mary Lou Roberts, took pictures of some wild Queen Anne's Lace. At one point she was shooting the common, white, weed blooms from underneath and capturing quite the uncommon picture.

Later I talked with Ms. Roberts and learned she had taken some instruction from Dave Chidley. I once worked with Mr. Chidley when we were both on the photo staff of The London Free Press. She learned the get-your-knees-dirty rule from Mr. Chidley.

Today, I pass the rule onto you.

Saturday, July 9, 2011

Bright Sunshine: Wait for passing clouds

Saturday was PhotoCamp London 2011 and one presentation was a live model photo shoot. The models, a man and a woman, were both professionals and it showed. They were very comfortable in front of the camera(s).

Unfortunately, the day was fiercely bright with a strong sun casting harsh shadows. Not the best light for fashion photography.

On the bright side, there were a lot of large, fluffy clouds dotting the Saturday sky. If possible, at times like this watch the sky, watch the clouds and shoot during those minutes when the day turns momentarily overcast.

Thursday, July 7, 2011

Flowers: Metaphors for life


There was a time when I thought of flowers, I thought of full blooms. I wanted peak action. No buds and no wilted petals. Just gorgeous flowers in their prime.

And then I experienced Sheila's art. Sheila, at the time, was painting flowers. She didn't narrow her focus to just blooms, the climax of the story. No, she captured the whole tale from bud to bloom to fading away forever.

Now, I see flowers entirely differently.

Today's image was shot with my Canon PowerShot S90 set to automatic. The jpeg was taken into Photoshop CS5 and the endpoints set; I was careful not to blow out the highend values in the yellow petals.

The foliage was already quite dark in the original image but, approaching Photoshop like an electronic darkroom, I burned down the edges even more. I do not use the burn/dodge tool. I selected the area on which I wanted to work, feathered the edge and finally darkened the selection using Curves. I stay away from the burn/dodge tool, although a fellow I worked with at the paper used it all the time.

This image has also not been given a lot of saturation. The jpeg image looked good right from the camera.

Wednesday, July 6, 2011

Watch for portrait moments


Fiona had had a big day: A long stroll through the neighbourhood, an action-filled visit to the park, a good dinner with her favourite vegetable — broccoli. Now, feeling a little sleepy, she plopped down on the loveseat in front of the television for a little quiet time.

This image is almost a straight jpeg from my Canon PowerShot S90. The endpoints have been set and the edges burned down but generally this picture required very little enhancement. This image hasn't even been hit with any extra saturation.

The light is good in this room. There are two windows: One behind her illuminating her hair and one off to the side giving the nice, soft portrait lighting. The white ceiling reflects nice clean light onto the subject.

If I had a DSLR I would use a lens in the 85mm to 105mm range and try and shoot with the lens as wide open as possible. Something like f/2.8 or f/4.0 would be good. The fast f/stop minimizes the depth of field, allows for a lower ISO setting and a higher shutter speed. A win, win, win proposition.

If your camera has a portrait setting, try that. You might find it softens the subject a bit much but try it; Find out whether or not you like the effect.

When composing your shot, if you have the person looking off to the side as I do, try and leave a little extra space on the side of the image where they are looking. Your picture will feel better balanced.

With my Canon PowerShot S90, I must confess, I simply picked up the camera, composed my image and shot.

Saturday, July 2, 2011

Texture, and more, makes this picture


This weed, captured going to seed, is amazing: The big, gossamer-like balls are magical. You cannot go wrong taking a picture like this. The thing to remember is to get close. Fill the viewfinder with the texture that attracted your eye and excited you visually. You want people to see this weed as you did. Force them. Don't show too much. Don't give them the chance to miss the picture since you didn't.

The image works for me for lots of reasons:

  • 1 - texture (The soft, gossamer like white fluff supported on spiky struts.)
  • 2 - repetition of shapes and repetition of the size of those shapes
  • 3 - lines of direction - They are almost classic perspective lines.
  • 4 - colour (Warm toned brown works well juxtaposed the warm green background.)
  • 5 - clear centre of interest (It's actually circled with lines from all over the image leading the eye to it. This is a centre of interest that cannot be missed.)
  • 6 - tones (Dark tones at the bottom give the image visual support.)

Friday, July 1, 2011

Grab shots can be nice

This shot could be better but its a nice grab shot.
Personally, I like pictures of flowers immediately after a rain storm. The light is soft and puts a wonderful catchlight on each water droplet decorating the flower petals. But an open shade grab shot still makes a fine memory picture.

I've been playing with shooting RAW. I'm having mixed results. I'm not sure that more control is always a good idea. I'm not convinced my decisions are always better than the camera's. I tend to like warm images. Because of this, when I enhance a RAW image it tends to be warmer than possibly it should be.

Also, working on a RAW image encourages me to play with the image more than I normally would. And trust me, I don't require all that much encouragement. I tried to keep the highlight areas from blocking up as I worked to make the foreground lily pop from the picture. The foreground lily is cleaner and brighter than the others. I'm not sure that the effect looks natural. It may look a little forced.

Here is an image shot with a Canon SD10 point-and-shoot a couple of years ago. It was shot as a jpeg, with the endpoints set in Photoshop to maximize the contrast. It has been enhanced very little compared to today's lily picture.

Clearly, the after-the-storm lighting gives far more punch to the image and the water droplets are a fine visual addition. This image makes today's photo look flat, a bit on the lifeless side.

Wednesday, June 22, 2011

Give it your best shot

My Fuji Finepix HS10 is a bridge camera; It is not a full-blown DSLR. When I saw a gorgeous dog playing a fine, energetic game of catch, I knew I wanted a picture.

But wanting and taking are two different animals. With the sun setting I knew my picture of the leaping dog could itself be a dog. I knew it could be ruined by the very action I was trying to capture.

Never let reality stop you from trying. You'll never win if you never play. Always take the picture. You have nothing to lose and everything to gain.

I set my Fuji FinePix HS10 to sports shooting and used the Best Frame Capture setting. Was I lucky? Did I succeed in capturing the leaping dog in the gloomy light of sunset?

I think I was lucky. Not totally successful but I think the picture still works. (Remember, I'm only shooting for the Net. A don't ask a lot of my equipment.) The best part of the night was that I got practice shooting action with my HS10. The next time I see this, hopefully earlier in the day, I'll get a great picture for sure. I promise!

If you can set your shutter speed, set a speed of at least 1/500 second. A setting of 1/1000 is even better for stopping fast action like this. You might need to up you ISO setting and accept a little noise in order to use such a fast shutter speed. Your lens will be wide open but if it is a zoom it may only open to something like f/4.5. If your lens is that slow, you may have problems unless you are will to boost your ISO as high as 6400. Good luck!

Monday, June 20, 2011

Image quality: How much quality do you need?

Had to run a little Lowbanks art before running the boring shot below.
Having worked for many years in the newspaper business, I've learned to set the bar pretty low when it comes to image quality. When pictures are translated into halftones with 100 dots to the inch, a lot of quality is lost. Also, when images are at the mercy of a backshop pressed for time and forced to cut corners to save time and money, those halftones may be of poor quality. And we have yet to consider the newsprint on which the pictures appear: yellow, thin, blotter paper.

Now, I am shooting for the Internet and my images must be reduced to 7-inches at 72 dpi and saved as jpgs in order to ensure they load quickly. I'm still kissing off quality.

Iron arches in the blocks to the right of the centre marten house are not visible.
The above shot of the beach at Lowbanks, Ontario, is 156 KB sized jpg file. If I wanted to make a large print, the enhanced file, from which the Internet file was created, is a massive 28.5 MB TIFF file. It was created from a RAW file captured by my Fuji FinePix HS10. Look at the flag in the middle of the picture and then run your eyes down the flag pole to the breakwall.

Iron arches in blocks are visible.
Do you see some small, steel arches sunk into the concrete blocks just over to the right? No? That's because detail easily seen in the large file has been lost in the small. Pictures destined for the Internet lose a lot of detail.

The image in which the iron arches are visible is a jpg cropped from the full-sized TIFF file. Unfortunately, in order to show you this cropped image I had to jpg it in order for blogger to accept it. The actual file has much more detail, even in the grass.

Recently, I read some posts on the Nothing Special photo blog. I found them inspiring. The author's writing made me think about quality in a way that I haven't thought about quality since art school.

At the newspaper, only one photographer shot RAW. One other photographer experimented with RAW but soon rejoined the jpg shooting group. Because of the image quality loss inherent in the newspaper business, most of us figured there was nothing to be gained by shooting RAW. I believe we were right.

I no longer work for a newspaper. Maybe it is time I started paying a bit more attention to quality. I am experimenting with shooting RAW. I cannot afford a different camera but that will be part of the challenge: How to squeeze the most quality from a bridge camera like a Fuji FinePix HS10 or a true point-and-shoot like my Canon S90?

Sunday, June 19, 2011

Cropping in camera and other tricks

Crop in-camera for photo files that make better enlargements.
Learn to crop in-camera. Short of buying a better camera, learning to crop your pictures as you are taking them is one of the most important steps you can take in improving the quality of your images.

Simple point-and-shoot cameras do not deliver the best quality images. My Fuji FinePix HS10 is especially poor when I am forced to enlarge an image. With my Fuji, blowing up the image is a very apt description of what occurs. Always keep in mind that the Fuji is a bridge camera; It is not a full blown DSLR.

Filling the frame is often enough. Unfortunately, with my HS10 sometimes when I blow up an image I discover soft, smudging areas. This can be visually very annoying. These smeary areas are where the in-camera algorithm for controlling noise has gone a little overboard.

I have been finding that if I shoot important images as RAW files and not jpeg I can skirt some of these issues. Photoshop CS5 Extended has better noise control algorithms than my Fuji. Or I can choose not to eliminate noise at all.

I have been criticized in the past for using Photoshop. Too expensive, I've been told. Well, watch for sales, I say. I managed to buy my copy for about 70 percent off list. Stay alert and maybe you will be lucky, too.

If you click on this image of Fiona, taken with my HS10, the image will enlarge. In the original, non-jpg file, if you took a close look at the buttons on her shirt, you could see that each of her pink buttons has two holes. This image was shot RAW and enhanced in Photoshop CS5 Enhanced. I stayed completely away from noise reduction in enhancing this image.

One other lesson has emerged here. If you intend on making very big prints, save a TIFF file along with any other files you may save. JPGs have their place, and with luck will make good enlargements, but to be safe keep an enhanced TIFF file in the wings ready to send off to be printed.

For Best Quality:
  • Use a DSLR to shoot your pictures. If this is not possible, it isn't for me, then make sure to:
  • Fill the frame when shooting.
  • Shoot RAW.
  • Shoot the largest file size that your camera is capable of shooting.
  • Save the enhanced image as a TIFF file.
  • Stay away from JPG if you want maximum quality.
Click to enlarge. In the original, non-jpg file, one could count the button holes.

Tuesday, June 14, 2011

Full, unenhanced photo from Fuji FinePix HS10.

The image file straight from the camera. Double click to view whole file.

I've read a lot of criticisms on the Web about the quality of the images delivered by the Fuji HS10. The criticisms are valid but one must keep in mind the size and cost of the HS10. I have a poor heart. I'm not going to carry a top-of-the-line DSLR and a couple of high quality lenses everywhere I go. It is just not going to happen.

The Fuji is not a bulky, heavy monster. It is a joy to carry; It is not always a joy to use. It can be slow to react when the shutter is depressed. But, if you've got the patience in most cases you will get the picture.

A program for enhancing your pictures also helps. For publication on the Web, I usually enhance my pictures, resize them to a width of 7-inches with 72 pixels per inch and sharpen before placing them on one of my blogs.

File size reduced, image enhanced and sharpen, and finally posted on Web.
I gave up a couple of fine Canon EOS DSLRs when I left The London Free Press where I was a staff photographer for more than three decades. I confess, I miss those superb cameras and my bag of lenses. That kit was valued at more than $30,000 Canadian.

I can afford to miss that kit; I cannot afford to miss the $30,000 I'd need to spend in order to replace it. If you shoot for fun and are more concerned with your overall images than pixels, you might find the new Fuji FinePix HS20 to your liking.

If you are into ultimate quality and have the bucks to afford to play in the big-boys' sandbox, go to the blog Nothing Special and click on Fuji HS10 near the bottom of the Index to Articles. I don't believe the author of this blog has tested the HS20 at this time.

Shooting RAW may have advantages.
I was surprised that the Nothing Special blogger has been amazed at times by the HS10. He seems a tough critic to impress. That said, I can't see him being too happy using either an HS10 or HS20.

Reading Nothing Special's posts made me look at my pictures with a more critical eye. I've started experimenting with shooting RAW. This, I hope, will keep the in-camera algorithms in check and prevent the blurring and smudging that occasionally mars photos.

The shot of Fiona was shot RAW and reduced in Photoshop for inclusion in this post. The quality of the large image indicated there may be advantages to shooting RAW. For instance, no smudging anywhere of grass blades into a smeary patch of green as happens with jpegs.

Tuesday, June 7, 2011

Watch the light


Photography is about light. No light; No photography.

A stunt favoured by cave tour guides is to turn off all the cavern lighting when the tour reaches the deepest point in the earth. People discover without light, they cannot see — nothing, nada, zilch. The world in an unlit cave is a black void. Encouraged to wave their hands in front of their faces, they cannot see their hands no matter how close to their faces they are waving them.

For many people on such tours, this is the first time in their lives they actually have "seen" total darkness. Total darkness is pretty rare. For this reason, to find a spot where no photography is possible you may have to head for some caves.

If you head for the hills at night, simply bring a tripod and you'll be fine — especially if you have learned to watch the light.

Take today's picture taken in a relatively dark restaurant. To grab a photo here demanded a careful reading of the available light. First, there was some light coming through a wall of windows some distance away. It was nice soft light but weak and made weaker by the time of day — dusk.

The lights on the walls offered a way to backlight some scenes to force subjects to pop free of the background. (So often, in these situations, dark hair simply disappears into the dark background making for ill defined subjects.)

Even with most light coming from behind, I got a shot.
Using a Canon SD90 set to available light photography in a dimly lit environment, I supported my arm and held it in a position such that the wall lights gave a nice glow to the waitress's hair.

I tried to time my picture taking to a moment when both waitress and customer were still. When they were going over the menu, I saw my opportunity. I shot lots, and lots didn't work. Camera and/or subject movement ruined a number of shots. (I used a similar approach to capturing the interaction between the Bud Light Lime crew and a couple in a London, Ontario restaurant.)

Personally, I don't like straight on flash photography. Sometimes one has no choice but to fall back on one's flash for light, but if you can accept the coarseness of high ISO settings and the loss of a fair number of shots to movement problems, learn to watch the light and you will grab some nice unguarded moments.

Tuesday, May 24, 2011

Shooting Fireworks

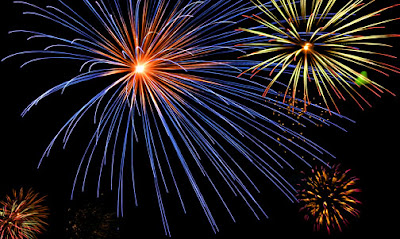
Shot with Fuji FinePix HS10 set to "Fireworks." Photoshop for multiple images.
To shoot fireworks you need a rock solid steady camera and a long shutter speed. An expensive camera is not necessary. A good quality, solid tripod is a blessing, but anything to hold your camera steady will do. Once, while working for the newspaper, I snuggled my camera deep into a big, heavy camera bag and with the lens pointing out and up at the fireworks, I got my picture.

In fact the picture I got wasn't just good but really great. Shooting from such a low angle, with a really wide angle lens, it might have been a 24mm, I captured not only the fireworks but some of the spectators sitting in chairs. I popped a little flash into the picture to add a little detail to the spectators. This was a story picture, a picture of the event, and not just a picture of fireworks.

With a fully manual DSLR camera:

Shot with a Canon SD10 compact point-and-shoot.
First, think picture. Good photographers are creative artists first and skilled technicians second.

Find a good vantage point for your shots. Ideally, you want to capture more than just a burst of colour in a night darkened sky. A picture that addresses the who, what, where, when and why of the event will be the stronger and far more interesting picture in years to come.

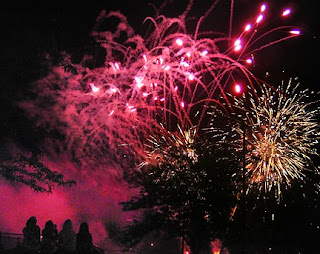
My shot of the girls watching the fireworks at a neighbourhood park was shot with a simple Canon SD10 point-and-shoot set to extended night exposure. I found an angle to silhouette the girls against the bright smoke from the fireworks. I was lucky enough to captured three bursting rockets in one shot. Love it!

Here in London, the fireworks are sometimes launched downtown over the forks of the Thames River. The obvious picture here is a huge, colourful burst or two with colourful reflections in the water below. If you can find and angle to show a few tall downtown buildings in the background, all the better.

With picture thinking out of the way:

  1. Ensure the camera is rock solid. Any movement during the exposure will ruin the picture. Obviously a good tripod is the easiest answer. Anything less can lead to frustration. Sometimes, in a pinch, you will be able to find a support for your camera at the event but this is not to be counted on.
  2. Choose a focal length to match your vision but be prepared to change this during the show. Wider is usually better than longer for capturing the context of the event. Telephotos will fill the frame with exploding fireworks.
  3. Set your focus at infinity. You will always be quite a distance from any major fireworks display.
  4. Set the aperture. I usually start with f/8 and stop down to f/11 if necessary. Remember, f/11 lets less light into the camera than f/8.
  5. Set the shutter speed to "B" for bulb or time exposure. With the shutter set to "B" you can depress the shutter button a moment after hearing the boom of the fireworks rocket launching. This way the shutter is open when the display starts. Keep the shutter button depressed until the burst begins to fade. This may be three or four seconds. If the bursts are coming quickly, one after another or overlapping, try holding the shutter open long enough to capture multiple bursts. If you find that you are causing the camera to move during the exposure, try using a cable release. With a good, solid tripod, a cable release is rarely necessary.
  6. Set the ISO. This does not have to be high. I have had good result shooting from ISO 100 to ISO 400. Fireworks are incredibly bright. High ISO settings are not necessary and may result in overexposed and/or grainy, images.
  7. Don't use your flash, in most cases. It will do nothing but possibly burnout the nearby foreground with overexposure. If your flash is built-in, turn it off. (This doesn't mean you can't experiment. You're shooting digital; You've got nothing to lose.)
  8. Check your images as you shoot, making sure the bursts are not out of frame. If you have a zoom lens, you can tweak the focal length if necessary.

To summarize:

  • Find your vantage point.
  • Mount your camera on tripod and frame your shot.
  • Choose the focal length of your lens.
  • Set the lens to infinity.
  • Set the aperture - f/8 is a good start.
  • Set the shutter speed - "B" or time exposure is best.
  • Set the ISO. ISO100 often works. Do not use an ISO higher than 400.
  • Turn off your flash, if necessary.
  • Check your images as you work.

If you have a point-and-shoot, your options are limited and they change from camera to camera. You still need a good tripod but after that you may be at the mercy of your camera. My Canon SD10 had a long, nighttime setting that was excellent for shooting fireworks.

Dedicated fireworks setting: Fuji HS10
My Fuji FinePix HS10 actually has a dedicated "Fireworks" setting. I find the HS10 chooses a time exposure that is a little short but it does work. I may try shooting fireworks using the HS10 in manual mode next time.

And if you don't mind altering reality a bit, you can always take your pictures into Photoshop or another photo enhancement program.

Red Rock, Ont.: Fireworks shot out a bathroom window. No sturdy tripod.

Sunday, May 22, 2011

Unenhanced vs. enhanced photos

I always print my digital images. I grew up printing my pictures in a darkroom and feel very uncomfortable not "printing" my digital images in my electronic darkroom: Photoshop.

The first image is an unenhanced grab shot of a number of goslings cuddling together to protect themselves from a cool, spring breeze. I racked the lens on my Fuji FinePix HS10 well out and shot the goslings with the camera handheld. Double-click to see the image full sized.

Unenhanced image as it came from the camera.
The second image has been taken into my electronic darkroom, Photoshop, and has had the white point set, the contrast has been tweaked using Curves, a little colour correction has been applied and then the colours have been saturated just a little. Finally, the image has been sharpened.

Enhanced image.

Whether you like what I did or you don't, it is clear that what the camera gives you is not the final say. Remember, the colour and the contrast delivered by the camera is not always dead on accurate. Photographers have been burning and dodging since the dawn of photography. There is little reason to stop now.

Clicking or double-clicking the above images should give you the larger, full-sized images.

Saturday, May 21, 2011

Join "City Daily Photo"


Have fun, learn a little about your town, and force yourself to fine tune your photo skills --- all the while sharing your town with the world.

My health has been giving me some serious problems of late and I have been letting down the "daily photo side." I really am sorry as it is a good group of people. Some of the members are damn fine photographers.

I took today's picture from the parking lot at my family doctor's office. I loved the imaginative balconies, the hard light accenting the strong, repetitious shapes and  bringing out the texture in the concrete. The bright, blue sky next to the grey and red-brown of the apartment was another plus.

Check out City Daily Photo and if your town isn't being represented, think about it. If it is being represented, note if a picture is really posted every day. If not, why not contact the person running your city's site and see if they could use a shooter. They just may love having the help. (I know I would.)

Cheers,
Rockinon
londondailyphoto1@gmail.com

Friday, May 20, 2011

Pictures roll in with the fog

You can set your white point almost to the max; Your strongest black is a gray.
When I saw the fog this morning I knew I had a picture making moment. Fog delivers beautiful images where normally the scene would be too busy to be worth taking. The fog mutes distant colours while making those very close to the camera pop in comparison. Fog adds mood and depth to an image with distant, distracting backgrounds fading gradually into the soft mist.

Sometimes the fog itself can be the focus of your images but for most pictures apply the usual rules: Have a strong, main subject, watch your composition and shoot fast. Fog can lift without warning.

A little selectively applied saturation helps this lilac bush pop.