Monday, December 17, 2012

Shooting action with a point and shoot

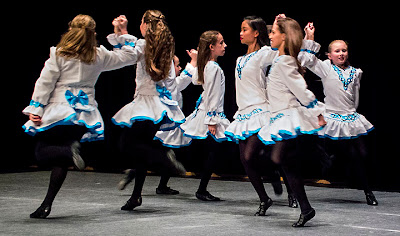
For me, the little dancer in the middle of the image  makes the picture.
I think of my Fuji FinePix HS10 as a glorified point and shoot. It appears, at first glance, to be small version of a DSLR but it is more illusion that fact. Oh, it has some nice features, I love the manually controlled zoom. It works just like my professional zoom lenses from my days as a newspaper shooter. But the oh-so-slow lens is a killer — a picture killer.

If you are like me, too poor to afford a complete DSLR kit, a couple of point and shoots can work just fine but you have to make some concessions. You've got to accept that you will have a high failure rate when it comes to taking pictures under difficult conditions.

Something that most folk forget is that action is not constant. If dancing girls are hopping about a stage, there is a moment when they are neither hopping up nor down. Action stops while the direction of the action reverses. Capture this peak moment and even a slow shutter speed will yield a picture.

Capturing the peak moment is easier said than done. I find with my HS10 that if I use the continuous shooting mode I increase my chances of hitting this action-capturing sweet spot.

Link the use of the continuous shooting mode with shooting moments when action has actually stopped is an even better way of guaranteeing an image. For instance, with the dancers there was a moment at the end of every reel or jig when the girls took a pose before bounding off stage. These poses made for perfect moments for maximizing the chance of capturing a quality photo.

One nice thing about posed shots is the quality; It is good enough quality to make acceptable prints. When images are presented online, they do not need the resolution demanded by images being made into prints.

If you are sacrificing movement in order to get a good image, watch for images with other features that can give the picture visual punch. Colour is a good thing to watch for. Splashes of colour almost always add to the appearance of a picture on a page.

Shooting a dance performance, inside on a stage, can be difficult when using a point and shoot. But, it is not an impossible situation. But, if there is one dancer, a daughter or granddaughter that you simply must have in a picture, go for the posed shot.

Saturday, December 8, 2012

Use "motor drive" with your point and shoot

Firing at wide angle maximizes the f/stop in use.
 O.K., it's not quite a motor drive. But, holding the shutter button down on many point and shoots will give a continuous burst of shots at a subdued speed — more like an old fashioned camera winder than one of today's super quick motor drives. Still, even a humble winder has its place.

My Canon S90 (the Canon S110 is the replacement) has an f/2.0 lens when used wide open. This demands shooting at wide angle. As the lens is zoomed it loses maximum aperture size. Shooting at wide open with the lens at wide angle, set the camera to available light photography. You want natural looking images taken without a flash. Most folk prefer the look of available light over harsh on-camera flash.

The school gymnasium where my granddaughter's Christmas pageant was held was somewhat dark, at least for photography. The shutter delay on my point and shoot struggled to focus and this meant lost pictures.

In situations like this I have found waiting for picture moments and then simply laying on the shutter button works wonders. Line up your shot, or anticipated shot, and then when the moment is right start firing. With luck you will grab an image with minimal subject movement. (I know you will hold the camera steady and keep camera movement to a minimum, right?)

As this was a picture moment, the potential for capturing a good image is there. Unfortunately, the slow shutter speed necessitated by the available light approach dooms many of the images. But, with my system you will have choices and a few of those choices may be just what the (photo) doctor ordered.

Points to remember:

  • Wait for a picture moment.
  • Shoot at wide angle to maximize the f/stop in use.
  • Keep the shutter button depressed to fire off a series of shots.
  • Hold the camera steady. If possible, brace the camera. 
  • Use a very large SD card. You don't want to fill your card during your shoot.
  • View your pictures at the soonest possible moment; Enlarge the best ones to ensure you've got your picture.

Wednesday, September 26, 2012

Not quite a silhouette


Not enough light? Before turning to your on-camera flash, consider shooting a silhouette or even simply shooting an image that is darker than your usual.

I "printed" this with the background a little darker than in the original file. Now that I am viewing the image on a "page," I am not completely pleased with my work.

I think the image would have more punch if the back lit pink crown was more blown out and the pink fairy wing were brighter. The second image is posted below. What do you think?


Saturday, September 1, 2012

Forced to use slow shutter speed, panning offered solution

Panning can capture subject movement.
Recently I visited Montreal, and while there I visited the Biodome. The exhibit made the news recently with the survival of a baby lynx, one of three, born to a captive Lynx that calls the dome home.

It's seems bright enough in the dome until one tries to take a picture of a moving lynx. Today's slow lenses in our point and shoot cameras have very small f/stops even when used wide open. These lenses demand the use of very slow shutter speeds in dimly lit indoor situations. A slow shutter speed, as you know, will not stop action. A blurry image is the result.

Panning is one way to squeeze an image out of a situation like this. Focus on the moving subject and pan, follow the subject with the camera. Squeeze off your shots carefully trying not to jar the camera. With luck, the feet and legs will be rendered as moving blurs of motion while other parts of the subject, such as the head in this case, are captured with an acceptable amount of sharpness.

My shot of the lynx was shot at 1/10th second at f/5.6 using and ISO of 800. I think it works. Sadly, I'm not sure the Biodome works for the lynx. The mother's constant pacing suggests stress.

Other animals in the Biodome environment looked quite happy. They were content. But I did not get a feeling of contentment and happiness from the clearly agitated lynx.

Wednesday, August 22, 2012

Little story additions make a big difference

Click on image to see expanded view.
What makes one picture better than an other? Clearly colour, composition, subject matter and quality of the image all enter into the equation. One often ignored quality is story telling. The richer the story told, the better the picture.

I've shot a lot of pictures of bees but I have never been able to show the pollen carrying sack as clearly as I did with today's image. For me the burst of colour, the placement of the bee, the clarity of the image and the story-telling mass of pollen carried on this bee's leg all work to make this one of my best bee images ever.

Monday, July 23, 2012

Photoshop or soft focus filter? Which is best?

The unsoftened image can be found here.

Back in the days that I shot film for the local newspaper, I played around with soft focus images. Soft focus does not mean out-of-focus. A true soft focus image is a blend of sharp image and a soft one. Soft focus images glow, the highlights may bleed into the surroundings, but these images have a sharpness that gives them the punch missing from simple blurry shots.

Some photographers used to try and produce the soft focus effect in the darkroom. This method didn't work well. One works with a negative in the darkroom with the result that the shadows bled into the highlights. For instance, bright teeth (high key areas in an image) were darkened by the bleeding of colour or tone from the surrounding areas.

I found that a Nikon Soft Focus No. 1 filter screwed onto the front of a lens worked best. These filters were perfectly clear with a pattern of diffusing dots scattered over the filter surface. The result was a Nikon sharp image with a soft glow. It was a very nice effect.

Now that I am shooting digital, I thought I'd like to try recreating the soft focus effect using Photoshop. I searched the web for ideas and tried a lot. They all, for one reason or another, failed to deliver the look I was searching for.

Then I found one site that had a method that was pretty good. I felt it produced a fine look that one could confuse, if one didn't look too closely, with the results achieved using the old Nikon filter.

Not one to rip off another blogger, here is link to the site with the soft focus effect instructions. Enjoy.

Link --- Soft-Focus Emulation in Photoshop

Monday, July 9, 2012

Kaleidoscopes for pictures with a '60s feel


Photography is about fun. Kaleidoscopes are about fun. When I found one of the cardboard toys in my basement on the weekend I immediately wondered what would happen if I tried to shoot pictures using the old thing.

When playing with stuff like this remember to try different lenses. For instance, I found that I got the results I was looking for with the kaleidoscope when using my lens zoomed to 105mm. The wide angle rendered an image trapped in a black circle. If you can control the f/stop, play with this, too.

The toy of the psychedelic generation pumped out some really neat shots. I learned that if you have an iPhone, there is an app for taking pictures that emulate my kaleidoscope. Check out Kooleido for your iPhone, if interested.

And of course, there is always Photoshop. For high quality results, Photoshop may be the best answer. Start with a fine quality image and let the software take it from there.

Still, there is something cool about using the real thing. It's a fun blast from the past.

Sunday, July 8, 2012

34-month-old shooter

Smile grampa Bill.
 
Fiona is only 34-months-old, but that is old enough to start learning how to handle a camera in my book. She has taken so many pictures with my Canon S90 she now calls it her black camera.

Only 34-months-old, Fiona loves cameras.
Last night she wanted to take a picture with her camera. I gave Fiona the Canon and warned her to keep her fingers off the lens. Her other grandfather started hamming for the camera and the little kid had a subject.We watched as she composed her picture and snap. She had her shot.

My Canon is a pretty solid camera but I watch Fiona very carefully when she is playing photographer. I think the risk is worth it. I hope it teaches her a little responsibility.

I also hope it helps her develop her photographic skills. She seems to have potential.

Sunday, July 1, 2012

Shooting those ceremonial moments


Personally, I like the "moment captured" type of photo but often folk want a traditional "smile for the camera" picture. This is often the case when shooting events: weddings, baptisms, retirements, and the like.

When it comes to these pictures, you should have an edge over the hired professional shooter. You know the subjects. You are a friend. Getting a good, warm smile should be easy. Thanks to the instant feedback offered by digital cameras, you will know when you have the picture locked up. Don't stop shooting until you're happy with the picture. But, possibly break your shoot into two or more takes.

If getting the right image is difficult, don't subject your friends to the "just one more" torture. Take a break. Give your subjects a rest. Don't tell them that you are not happy with the pictures. Just move on. Later, try again without making too big a deal out of it. Keep the shoot relaxed and the good images should just flow.

Bright, contrasty sunlight mixed with shade is tough to shoot.
If you are shooting outside, look for open shade. Harsh sunlight makes for harshly lit images. In a word: ugly. Inside, look for well lit areas with clean light. Stay away from incandescents that turn subjects orange or cool lights that render folk with a ghoulish blue hue.

Lastly, watch for props. The couple above are celebrating their retirement, of that there is no question. Incorporate the prop into the picture neatly, with as little wasted space as possible. Keep your picture tight and get immediately to story at hand.

Keeping your shots tight and not requiring a lot of cropping after the fact will keep images, even from small point-and-shoots, large and detailed enough for at least an eight by ten inch print.

Monday, June 25, 2012

Tools to improve your pictures: Colour, composition, subject placement, depth of field


I would never have noticed this picture if it hadn't been for my 33-month-old granddaughter messing about with my hens and chicks. When I got down to her level, in order to get her away from my plants, I saw the view that had drawn her there.

The tall stalk is the first sign of a flower forming. The pink top is clearly the centre of interest of my picture. I carefully positioned the pointy, pink tip in front of darker, brown gap in the solid mat of hens and chicks. This hid the gap and took advantage of the contrast, making the pink tip "pop" free of the image. Try to actively position the subject of your pictures. To accomplish this, shift the camera position. Always note how the foreground relates to the background. This is important. Remember, you have a lot of control --- use it!

Using the rule of thirds, the pink tip is approximately placed at one of the intersection points. This is an example of classic placement of a centre of interest. It's a classic approach because it works.

Another trick used to attract the eye while making the subject jump out from the image is the use of a shallow depth field. The foliage in the background is gently out-of-focus. Personally, I often find it distracting when backgrounds are too far out-of-focus. I don't want to obscure what is present in the background, I just want to divert attention from the background to the foreground.

Of course, colour and tone are also used here to attract the eye. The bright pink is a natural for attracting the eye, especially when placed on a green background of just about the opposite shade on the colour wheel. The bright highlights on the edges of the developing blossom also work to attract and hold the viewer's attention.

Lastly, keeping the subject, the pink-tipped stalk, large in the image underlines the subject's importance. When composing a picture, always consider image size in the final image. Getting close to the subject, as I did, makes the subject relatively large compared to the other stuff in your image. The subject doesn't always have to be the biggest thing in your pictures. Just keep in mind that, to a great extent, you control the size of your subject through the choice of lens (wide angle or telephoto) and the shooting distance you choose when positioning the subject in front of your lens.

This is a simple picture but I like it. It captures the beauty of a spreading patch of hens and chicks --- a beauty that goes unnoticed all too often. Now, grab your camera and head out to the garden; I am.

Saturday, May 26, 2012

Be brave and save the long lens for lions


Bugs are surprising, especially in photos. Their wings are so delicate, their bodies prickly with stiff, sometimes colourful, hairs. They are just generally creatures from another place --- from a world too small to see.

When I got interested in photography taking good pictures of bugs was difficult, and it was expensive. Today all that has changed. Most point and shoot cameras have macro settings, often the icon for close-up photography is a flower, and many cameras will shift into their macro setting automatically. What could be easier?

What is left for the photographer? Answer: getting close. Try and capture a big image, one that reveals details generally hidden by the bug's small size. Bees and wasps are good subjects if you are careful and don't get them agitated. They themselves are very colourful right off the bat and then you have the colourful flowers on which they feed. Perfect.

Monday, May 21, 2012

Turning a weakness into a strength


My wife is not fond of hostas. Just a bunch of green leaves, she says. I, on the other hand, love 'em. I see colour, mostly green I grant you, but many have wonderful splashes of yellow and others sport dashes of creamy white.

I love the way the expand quickly in the spring, claiming the entire area of the garden they occupy as their own. The leaves swirl and overlap and, to me, they are as beautiful as a large, colourful flower.

When the hosta flowers appear in late summer, small purple flowers on long stems, their look is overshadowed by the plant's leaves. Still, the flowers are a nice addition to the dramatic, hosta presentation.

Capturing what I see when I look at a hosta means getting in close. It means keeping all in crisp focus. It means finding and capturing the mad swirls and twisting splashes of colour.

And this is a job than can be handled with aplomb by almost any point-and-shoot. I used my Canon S90 but I can't think of a PAS camera that wouldn't rally to this challenge. It is not just the aperture, the f/stop, that governs depth of field, deep focus in an image, it is the size of the sensor.

35mm cameras had more depth of field than their large two and a quarter brethren. Today's digital PAS cameras have even more depth of field than their 35mm counterparts. So much depth of field poses its own set of problems but here it is a solution and not a curse.

Sunday, May 20, 2012

Hey kid, time for lesson No. 2


Fiona has a hard time using my little camera. She gets her fingers in front of the lens, or worse she gets those smudgy fingers right on the glass. Holding the camera steady is a whole other problem.

I have a problem, too: Patience. I tend to run a little low on the stuff when she's got my Canon S90 --- a camera she has taken to calling her camera.

Seeing a purple flower, she wanted to use "her" camera. I had to remind her to keep her fingers off the lens. I had to tell he not to get too close. The camera can't focus when you get in too tight. To which she asked, "What's focus?"

She took picture after disappointing picture. I kept encouraging her. She could see she had missed the shot from viewing the image on the back of the camera. But I could see the back of the camera as she c composed her shot. I could tell her to raise the camera or lower it. I admit to helping her crop the final picture of the flower that she so desperately wanted to capture photographically.

Thanks to bright sunlight, usually the bane of photography, she had lots of depth of field and a quick shutter speed to stop the camera wobble. She doesn't have the steadiest of grips.

It was tough, on both of us, but I think it was worth it. The little girl got her shot of the purple flower.

Now, if you've got some little ones in your life, give some thought to letting them use your camera. It is not a toy. This is not just play. But, this is fun. Stay close, don't let them abuse the camera --- on purpose or by accident -- work with them so they can share their view of the world with others.

Good luck!

Tuesday, April 24, 2012

Lesson No. 1, kid.

Get your fingers off the lens, kid.
Years ago I wrote a photography column for The London Free Press. One column encouraged readers to let their children use the family camera. Watch them carefully, I said, don't let them drop the thing. To prove that kids could be trusted, I borrowed a friend's five-year-old and headed off to a local park.

After breakfast can I take some pictures.
The little one did quite well. In fact, for years I used her picture of a number of swimming water birds to shame grad students at Western into applying themselves at photography.

My granddaughter is almost 32-months-old and I'm thinking it is time to hand her the camera. She agrees. We go for walks and she sees stuff that interests her. Pointing this stuff out, she tells me, "Get out the camera. That makes a picture!"

Rather than take orders from a toddler, I'm giving her the camera. Heck, she is always saying, "I want to do it myself." I've decided, "O.K. kid, do it yourself."

I say, you're never too young to learn to keep your fingers off the camera lens. That'll be lesson number one.

Sunday, April 22, 2012

Be Prepared

The fast f/2.0 lens of my Canon SD90 comes through again.
Little Eloise has wonderful skin: Blemish free and a healthy, rosy hue.

Sitting in her car seat with her purple Teddy bear Violet, the lighting in our hallway entrance was perfect. It was soft but directional and clean. The colour temperature could not have been better. All that was needed was a catch light in her eyes.

I took a few shots in case she never did look up. I didn't want to come away with no picture at all. But, I was in luck, she glanced upwards and "Snap!" I had the picture.

Learn to watch the light illuminating your subject; Anticipate future action. Photographers are wise to apply the motto of the Boy Scouts: "Be prepared."

Sunday, April 15, 2012

For want of a battery the photos were lost

All images shot with my Canon PowerShot SD90.
 Today I went with a friend to the Butterfly Conservatory in Cambridge. The place has something on the order of 2000 butterflies and moths flitting about the exhibition hall. There are lots of picture opportunities.

With today's point and shoots, with their relatively fast lenses, both close-up and telephoto capabilities, taking pictures should be, forgive me, a snap. Unfortunately, my friend packed it in early. His battery died and he had not brought along his spare.

I know he has one. When he got his little point and shoot, I insisted he buy a spare battery and I encouraged him to carry it with him whenever he was out taking pictures.

Many folk think erroneously that taking pictures is hard. It isn't. Not anymore. Just being there is often enough, as long as you are there with a working camera. This means having at least two batteries: a fresh one in the camera and another in your pocket. For most of us, this will get us through a day's shooting.

And don't forget the card. I like my SD cards with lots of capacity --- 8 GB is my smallest card. I don't want my shooting grinding to halt because my SD card is full. For a bit more about the day and another image from the shoot, please check out London Daily Photo.

Tuesday, March 20, 2012

Shooting flower show beauties


Selective focus makes this orchid pop.

Recently I attended a flower show dedicated to orchids. The fellow I was with is an orchid enthusiast. On arrival he immediately set about trying to capture images of prize winning orchids. Watching him made me wince. He made shooting pictures of flowers look incredibly difficult. It isn't.

Most of today's digital point-and-shoots have a macro or flower setting. Many will shift to these settings automatically based on the distance at which the lens is focused. What could be easier?

My friend would choose a flower and then, using his motorized zoom, he'd try to frame his image. The zoom was jumpy. A touch of the control and the flowers exploded across his viewfinder: too large. Another touch, and the flowers receded into the distance: too small. He soon put his camera in his pocket.

The strong diagonals help this shot.
Augghhh! They are called point-and-shoot cameras for a reason. Our amateur photographer should have practised KISS (Keep It Simple Stupid). He should have simply picked a focal length and set to work on the real problem at hand: capturing some nice shots of orchids.

I have said it before but I'm going to say it again. The most important book for you to read before setting off to shoot pictures is the instruction book that came with your camera. I doubt that my friend has ever sat down with that oh-so-important book and played with his camera. If he had, he would not have frustrated himself zooming the lens in and out.

So, how should he have approached the problem?

  • First, pick a flower. Hey, this is a flower show. What could be easier.
  • With the lens set to a 50mm equivalent setting, frame a shot.
  • Watch the background. You cannot move the flower, so move the camera.
  • If there is no way to eliminate all distractions, consider using a different focal length and trying again. Longer lens settings will minimize background clutter. As the lens moves into telephoto range, watch the focus. Make sure the camera is still able to focus sharply on the subject.
  • Watch the light. If there is clean but diffuse sunlight pouring in a window, try and take advantage of this in order to keep the flower colours clean and vibrant.

If all of the above fails, choose another flower. Hey, it's a flower show. You have lots of choices. (Keep an eye open for all picture possibilities. The shot below shows an orchid inside a protective, stiff plastic container.)

The reflections add extra colour and interest to this image.

Friday, February 17, 2012

Watch for backlighting

Not the strongest example of backlighting but it works.
I have a soft spot in my heart for backlit images. When I worked at a newspaper and had to shoot a quick picture with punch, I often went with a strongly backlit image. Hiding the background light behind the subject would make this image pop. Composing the image with the light hidden will rim the head with almost glowing hair and dramatically separate the subject from the darker background.

Although the image is backlit, it is important for the photographer to still pay attention to the light falling on the subject from in front. All too often, I see backlit images that die on the page because one cannot make out anything other than the strong rim light. In most cases, a person should be easily recognized in a backlit picture. Faces shouldn't just fall into the deep shadows and be lost, unless you are trying for a dramatic, artsy image.

Fiona has lovely red hair and the warm back lighting not only created nice highlights but made her wayward curls easy to see and to appreciate. The soft light falling on Fiona's face is as important to the picture as the backlighting. Having all the light sources working together makes this image work.

And how did I figure out my exposure? I let my Canon PowerShot S90 do the work. (Although I knew the exposure would be weighted for the face. The camera was set for centre weighted exposures.)

Friday, February 10, 2012

Recognizing picture moments


I take a lot of photos of Fiona. She is just 29 months, a little young for a camera. I've given her my Canon S90 but she finds it difficult to frame an image while depressing the shutter button. She has the interest and I'm going to let her keep practising.

As important as it is to be able to handle the camera, it is just as important to know what stuff to shoot. What makes a picture? This is the question that every photographer must answer.

Fiona is getting there. She is developing "a photographer's eye." When she saw her first angel decorating a lawn at Christmas, she cried, "Gaga! Take a picture!" I did. And she checked my work. She knows how to activate the rear display screen and advance through the images stored in the camera. She's quite at ease making comments on my work.

The other day she was learning how to grate cheese. It was a first for her. First time stuff like this make a memorable moment --- a picture moment. "Take a picture!" she ordered, and then turned back to her work. She knows grating cheese makes a picture and not saying cheese and grinning at the lens.
________________________________________________

Things to consider when shooting kids:-

  • Try and get down to the child's level
  • In most case, do not shoot the tops of heads.
  • Faces are important. Try and capture an emotion.
  • It may be a still picture but often a little captured-action helps.
  • Try and compose while shooting. Think final composition.
  • Try for a moment captured and not a grin-for-the-camera shot.

Monday, January 23, 2012

Shooting news with less than the best

A newspaper quality shot of Ken Lewenza, national CAW president.

The other day I covered a rally in London, Ontario. I was writing a story for the Digital Journal and needed art to accompany my piece.

As a former newspaper photographer, I can appreciate the advantages offered by top-of-the-line equipment: No shutter lag, great motor drives and phenomenal image quality.

Unfortunately, the one disadvantage is price. No longer working for a newspaper, I can no longer afford the best. So, I shoot with a Fuji FinePix HS10 and a Canon PowerShot S90. I carry a spare set of batteries at all times for both cameras.

I have one other problem when I am out shooting news. I have a heart condition. Ideally, I would have liked to be on stage shooting with the local news folk but if I had a "spell" and I was on stage, it would be embarrassing and disruptive. I staked out a spot in front of the stage. And I did have a spell and was able to ease myself out of the crowd and find a seat to recover.

My small, shoulder case with two cameras and spare batteries is quite light. It is light even for me.

I think my shots from Saturday are proof that reporters can get usable shots using simple equipment. They may not get the images that a photographer would, the shutter lag alone is enough to prevent that, but they will get good, usable stuff.

One needs at least one overall crowd shot. One quick shot from the stage delivered.

A real strong selling point when it comes to my kit is the wonderful zoom lens on the Fuji FinePix HS10. It goes from a wide angle to super telephoto and it does it with a twist of the lens, rather than a push of a button. I much prefer the manual approach over the motorized one for setting the focal length of the lens.

I'd write more but you get the idea, I'm sure. If not, check through some of my older posts about these two cameras. If you write me, I'll reply or add to this post so that all can benefit.

Good shots are made at rallies using all focal lengths.

Friday, January 20, 2012

Capturing those special moments

Shot RAW, colour is better than jpg but I still missed the peak moment.
My last post looked at saving a special moment by cutting and pasting together two images taken moments apart. It's a Photoshop ruse, for sure. But, I posted the "trick" and the voting was almost unanimous: The doctored picture was best. Even the subject in the manipulated image voted for the Photoshop worked pic.

Well, wouldn't you know it. I was back shooting a similar picture just this past weekend. This time it was grandma Cathy, grandpa Bill's wife, who was celebrating a birthday. I decided to use my Fuji FinePix HS10 set to best picture capture mode. I left my Canon PowerShot S90 in my bag. Also, I shot the image RAW.

I like the colour and detail in the highlights better in the Fuji image. But the moment captured was not the best. It is a moment too soon. The peak moment was still to come. I missed it.

There are advantages to cameras without shutter lag. There are times I sorely miss my high end Canon SLR. Motor drives are no match for good reflexes. A fast camera with no shutter lag, teamed with a blazingly fast motor drive, attached to a flash capable of firing as fast the motor drive, ah, now that is the answer to all my problems but one: Money. A camera like that makes my money problems much, much worse.

I'll just have to keep getting by.

Tuesday, January 10, 2012

Is this allowed or not? You be the judge.

This is two pictures taken moments apart merged.

Get a picture of grandpa and Fiona blowing out the birthday candles. It was an order.

In the old days, when I worked at the paper and used top of the line Canon pro digital SLRs, such a picture was a breeze. I might even bounce just a touch of flash into the scene to pump up the shadow detail.

But that was then and this is now. I am not at the paper and I no longer have that gear. In dark situations I shoot with a Canon S90. In this example today, I shot on auto at f/2.0. But, even f/2.0 wasn't a big aperture to capture a picture after the candles were blown out and I wasn't fast enough to capture the action the first three times.

That's right, I shot this action four times in order to get one picture. I liked that one picture but my wife didn't like grandpa in my fave picture. She liked him in a shot taken moments before. No problem, except for the morality of it all, simply grab the grampa's face from one image and paste it over top of top of the other photo.

At the newspaper, this was a firing offence. In this situation, it is a keep peace in the family procedure.

I actually like the unmucked-about-with picture best. I like the way grandpa's face looking down leads me to the action below. What do you think?

Sunday, January 1, 2012

Shooting with the best is no guarantee of quality

Lifted from the site of a well respected newspaper.

I know the equipment that is used by the photographer who shot the above photo. The stuff is the best. The image is, forgive me, very poor. I'm sure it was cropped from a larger image. I'm sure there is an explanation for the poor quality. Still, it makes a point. The very best equipment does not guarantee that the final image will be good quality.

It so happens that I shot something similar. Here is my take on this image. I took my image, not with a top of the line DSLR, but with a point and shoot. Granted, I didn't use as long a lens but if I had I would have used a tripod and the smallest aperture possible.

Whatever, I don't find the out-of-focus image professional.

Take a lesson from this. Don't feel you can not do good work because you don't have the best equipment. You can do some damn fine work if you learn to work within the limits imposed by your gear. And, you can do some damn awful work with some awfully expensive camera gear.

Happy New Year!

Blow this up and you still  have a better image than the pro.