Saturday, April 13, 2013

Shooting RAW

Shot through a kitchen window using a Fuji FinePix HS10 shooting RAW.

For years I resisted shooting RAW. I used a couple of high end Canon DSLR cameras shooting for the newspaper and these cameras did just fine shooting jpgs. A powerful program like Photoshop had no difficulty colour correcting my shots and when working to deadline most of us in the photo department found jpgs quicker to correct and send off to the desk than RAW images. One shooter actually shot RAW briefly and then switched back to jpg. For me, this confirmed that shooting jpgs was the way to go at the paper.

That said, since leaving the paper a big disappointment for me has been the incredible amount of processing performed on jpg images by point and shoot amateur cameras. My early Canon SD10 wasn't anywhere near as sophisticated as todays cameras and I believe it was a much better camera for it.

My Canon S90, as nice a camera as it is, has some faults that are making me question whether or not I have been too accepting. For instance, the in-camera processing will sometimes blur areas in the image. Sharpening and blurring are both done in-camera when saving jpgs but neither is carried out on RAW files.

Unfortunately, shooting RAW turns off the image enhancement features you want along with the ones you don't. The Canon S90 lens suffers from a lot of distortion at wide angle. For the most part, the photographer shooting jpg does not see this. The in-camera computer corrects this distortion before saving the images as jpgs. Shoot RAW and the distortion will be there to see. No in-camera correction.

So, why am I thinking of shooting RAW? I got a real deal on Photoshop a year or so ago. I've got software powerful enough to fix any distortion. Render intricate detail as blurry mush and there is no amount of Photoshopping that will bring back the missing visual information.


Look at the far left of this image, at the little rabbit's rump, do you see how blurry the fur is. My guess is this fur would be detailed if shot using RAW rather than jpg.

For a more detailed discussion of shooting jpg vs. RAW, here is a link to a fine technical site:

Understanding RAW

There was a time I was an I-care-about-the-science kind of photographer. I used to try water bath development to capture detail in church windows while holding detail in the dark, shadowy pews. Slow, I had those concerns beaten out of me. I learned that three years of art school and more years spent at Ryerson earning a degree all worked to fill me with far too much fear.

I learned to focus on the subject to the exclusion of everything else, to strive for images that could be delivered quickly to the desk while capturing the subject accurately enough to keep the editors happy. Heck, by the time a reader saw my shot it had been translated into a halftone, separated into three colours and printed on newsprint. One could easily get too concerned with quality, quality that would never make it to the reader.

Now, some years into my retirement, I am starting to think it may be time to get back to my roots and spend some time getting a good handle on this digital photography beast. It may be time that I learned what my computer-that-takes-pictures (my digital camera) is really up to. The world of silver halide is gone and maybe I need to get in step with the changes.

--- As you may have noticed, this is more a blog than a source of great photographic insight. Follow my tips and you'll be a better shooter but that's all. Maybe better isn't enough. Maybe I should raise the photo quality bar. ---

Friday, April 12, 2013

Cameras aren't toys . . . uh, yes they are!

Fiona, 3, taking some pictures of a bunny in our backyard.

"Fiona! Gug-ah's camera is not a toy!" This was the warning shouted at Fiona when she dared to take my camera to get a shot of something that "made a picture." Let me make one thing clear, it wasn't a warning from me. I've given the little girl permission to use my small point and shoot anytime she needs a camera.

Fiona has been taking me up on my offer since she was two. Now, at the age of three, she is beginning to amaze even me. And I'll admit, I'm partial to the little kid's work.

I like this shot but Fiona wasn't satisfied.
When Fiona asked for my camera this morning, it was to take some pictures of a bunny nibbling grass in the backyard.

I gave her my Canon S90 with the lens zoomed out to 105mm and I went for my other camera, a Fuji FinePix HS10. Fiona took shots of the bunny; I took pix of Fiona.

When I viewed Fiona's work, flipping through the images on the camera-back monitor, I was surprised to see she had captured the rabbit very nicely in a number of her shots. The short telephoto hadn't caused her much grief. The biggest problem was subject movement and camera movement. Both worked together to screw up almost all her pictures. Even the ones posted, suffer some from movement.

I was most disappointed by all the photos showing the rabbit mainly from the back. The bunny's rump was the main thing in those pictures.

Chatting with Fiona, I was surprised to learn that my granddaughter wanted to take the pictures accenting the bunny's "behind." According to the little girl, pictures of a rabbit from the side or front, ones that accent its face, are common; Shots featuring a rabbit's rump are not your everyday picture.


Fiona's approach is a simple one and will increase anyone's chance of a successful shoot.

  • Know what you want to feature.
  • Shoot lots. If you don't get what you want, at least you'll get something.

Saturday, April 6, 2013

Bounce fill often better than adding another light

Years ago I heard a famous New York fashion photographer describing how she lit her shots for the covers of famous magazines. She used one light and a carefully placed wall of inexpensive white foam board for fill.

It was a good tip and one I went on to use for not just fashions shoots but food shoots and more. Now retired and blogging, I needed a shot of a drug blister pack showing some writing on the foil. My first shots were all too contrasty.

I was doing my shoot on the dining room table with the light supplied by a nearby window. The light was soft, directional and yet too harsh for the foil.

I looked about and grabbed the napkin holder filled with white napkins. I slid the hold into position below the blister pack. (See picture.)

The white napkins reflected the window light back into the shot, lightening the harsh shadows that had been hiding important lettering. The yellow table cloth also benefited from the boosted light level.

It took five seconds to add a "second" light. Five seconds!


Check the results. It was five seconds well spent. And the napkins could still be used as napkins later.


Thursday, March 21, 2013

Learning to shoot blind

Light was wonderful but finding a vantage point was a challenge. A point and shoot met the challenge.

News shooters know this trick. Often, when caught inside a tight scrum of photographers, they do the only thing possible. They hold their cameras above their heads and they shoot blind.

At least, this is what they did two decades ago. Today, with monitors on camera backs that flip out and even possibly rotate, it is no longer so imperative that one keeps one's eye to the viewfinder.

For more than four decades I was a news shooter. I learned to hold my camera high above my head and shoot with film and with trust. When I got my first point and shoot, a Canon SD10, I found I had a camera that did not have a viewfinder and the monitor could not be viewed in bright sunlight.

I'll admit that I thought I was snookered. I confess that at first I hated that camera. Unfortunately it was a gift from my wife. Returning it was not an option.

Red sketch indicates camera position.
So I learned to shoot in the dark when I was in bright sunshine, or so you might say. The talent I had honed shooting above the heads of other photographers, I put to a new use. Looking at my portfolio of shots taken with my SD10, I've got to admit a whole lot of them were taken "blind."

The other day I saw my three-year-old granddaughter doing a Dora puzzle. She was facing a living room window, the light was wonderful, the moment memorable but there was no way I could get into position for the picture. If I took the time to move the plant and pot sitting just where I wanted to be, the moment would be lost.

I sat down, hung my arm over the edge of the sofa, and with my hand almost at floor level, I started shooting and shooting and shooting some more. Exposing digits is cheap. The constraints of expensive film are concerns from yesterday.

My Canon S90 doesn't have a flip out monitor, but it does have an f/2.0 lens at wide angle (28 mm). And it can be set to take a lot of pictures in a hurry. It may be an amateur point and shoot, but it is a pro at handling focus concerns and exposure calculations.

I shot lots and I got a picture with lots to like. I also got lots not to like, but that's O.K. Talk and digits are cheap. Good pictures are priceless.

Learn to shoot blind. It'll open your eyes.

Tuesday, March 19, 2013

A fast lens and available darkness makes a better picture

When I got into photography in a serious way, my photography instructor drove home the idea that slow lenses were for amateurs and fast lenses were for pros. Part of the reason for this was cost. Fast lenses cost a lot more money. An f/3.5 lens was a lot less money, and also weighed a lot less, than an f/1.8 lens.


The above shot of my wife blowing out the candles on her birthday cake, surrounded by her grandchildren, was shot available. I had the lights turned out in the dining room but there was some light spilling into the shot from a distant kitchen.

I made sure the three were facing the lit kitchen and not the dark wall behind them. The positioning was under my control. I see nothing wrong with taking a little control when shooting family pictures.

The shot may be a little grainy but I can live with that. I like it much more than a shot done with an on-camera flash that provides a cold blast of light illuminating the scene in an unattractive, flat, shadowless manner. (And a faster lens helps to keep the need for ridiculously high, image-damaging fast ISO-speeds, to a minimum.)

If I were buying a point and shoot today, I would make sure it had a least an f/2.0 lens like my now aging Canon S90. Do a google search and you will find there are even faster point and shoots out there today.

Remember, the smaller the f/stop number the faster the lens. f/1.4 is a full stop faster than f/2.0 and two full stops faster than f/2.8. And even with a fast lens, try and brace the camera while taking your shots. A steady camera is important even with all the image stabilizing technology used in making cameras today.

And as most point and shoots suffer from camera lag, I find shooting bursts of shots and just not single pictures helps to capture the moment. With some cameras this may force you to accept smaller files but this is not a problem if you are not making enlargements bigger than eight by ten.

Monday, March 18, 2013

Why I like a fast lens: f/2.0 and no slower than f/2.8

The skin peels from Bud Gardens, revealing a skater underneath.

The World Figure Skating Competitions were held in London, Ontario, last week. I'd have loved to shoot some of the action on the ice but the ticket costs were out of the reach of this retired photographer.

But outside the arena, on an exterior wall to be exact, there was another event to photograph: The Tree of Light light show. This was one of those 3D projection mapping displays so popular around the world.

The company that produced the one in London was the Moment Factory out of Montreal, Quebec. The Moment Factory has done work across the globe.

These projections are incredibly bright and easily photographed using almost any point-and-shoot camera. Still, having a camera with a fast maximum f/stop at wide angle is still a plus. A fast lens means you are prepared for the worst. You know you will get a picture.

You also know that you may get by very nicely without the use of either a tripod or even something on which to brace your camera.

The fast lens also makes it easier for the camera to focus accurately and quickly. Faced with a choice between a fast lens and a longer zoom range, I'd take the fast lens every time.


But, the advantages of a fast lens are not restricted to rare occasions such as shooting projected displays. A fast lens is called on to provide its magic on almost a daily basis.

When my granddaughter did an impromptu dance, causing her dress to swirl, my Canon S90 with its f/2.0 lens had the lens for the job. It may have been night, the illumination may have been a low wattage fluorescent bulb, but the Canon S90 succeeded where other cameras might well have failed.


Wednesday, February 27, 2013

Possibly best camera ever for newspaper reporters?

If you came here looking for a technical report on why I picked this camera and not that one. You've come to the wrong place. I've never used a camera from a high-end manufacturer that had a lot of hidden surprises. A careful reading of the specs released by the camera maker is usually enough to let me know whether or not a camera will work for me. If I need confirmation, I find a few in-depth reviews on the Web. Every thing I know about the Panasonic Lumix FZ200 tells me that it will be my next super-zoom and I'm quite confident that I will be happy with my new camera. I've already stopped by a camera store and the FZ200 passed the 'how does it feel in my hands' test.

For a technical report go to Camera Debate 


A good technical look at the Panasonic FZ200 can be found on Camera Debate. Interestingly, they compared the FZ200 to the Canon SX50 HS and the Canon won. They went for high ISO quality over the constant f/2.8 aperture.


See images taken by with an FZ200 at CNET Reviews


If you want to see a good selection of images taken under a good mix of conditions, click the link to  CNET Reviews. Do you agree with Camera Debate that the digital grain ruins the images by ISO 800? Based on the photos posted by CNET, I believe I could live with the grain at ISO 800. But, I would find ISO 1600 getting a little too rough for some applications.


FZ200 quality at f/2.8 and 600mm equivalent lens length, posted by Panasonic.

My post 


I worked as a staff photographer for nearly four decades in the newspaper business. My first camera kit was based on a 1960s Pentax Spotmatic body mated with three lenses: A 28mm, a 135mm and a 300mm telephoto. The 300mm was the slowest lens of the bunch at f/4.0.

The Pentax wore out rather quickly, dying from way too much use. It wasn't designed to take a thousand pictures a week, fifty thousand a year. I replaced that first kit with a Nikon F2 plus another gaggle of prime lenses. I loved my Nikkor 28mm f/2.0. It was some piece of glass. The rest of my kit simply duplicated the Takumar (Pentax) lens based kit.

I stayed with Nikon for years, upgrading the lenses from prime to zooms as soon as zooms that held a constant aperture of f/2.8 hit the market. When the paper at which I worked offered to pay for our personal camera kits, I switched to the Canon EOS line of professional DSLRs. I got by with two zooms lenses plus a 200mm, f/1.8, telephoto which converted to 400mm, f/3.6, when used with a 2X teleconverter.

When I retired, the paper kept my gear. I found myself forced to embrace new cameras and tackle a new approach to photography in my senior years. Money and a bad back ruled out replacing my work gear with more Canon pro stuff. I decided to buy two cameras: A Canon S90 which offered a fast f/2.0 aperture when used at wide angle (28mm) and a Fujifilm HS10 superzoom with a lens capable of emulating a 24-720mm zoom on a 35mm camera.


Taken with my Fujifilm HS10 zoomed to the max, this is a great image.

I love the Canon S90. I have absolutely no complaints with that camera. I do not hesitate to recommend its latest incarnation, the Canon S110, to those looking for a compact point-and-shoot. It does have some competition today, there are other f/2.0 wide angles being offered, google the reviews. Maybe there is a better choice today but you can't go far too wrong with the Canon.


Orchid shot with Canon S90 at show in a school gym.
I've had great luck with my point-and-shoot camera kit. I haven't been thrust into any situation where I could not get an image. That said, it has been tough at times.

The biggest problem has been lens speed. Both cameras are damn slow when zoomed out to telephoto. f/5.6 is just not good enough. One can make do. One can get by. But in professional do-or-die situations, these cameras have serious limitations.

My Fujifilm HS10 has had a rough life. It has been dropped into coarse gravel and onto a hard tile floor. It keeps going, so I must give it an A- for solid build quality. It gets the minus because the camera back monitor blinks on and off at times and something else is amiss inside the camera. A colour cast is appearing in some images of late. It is time to think about a replacement for the HS10.


I've had good luck shooting with my HS10. I had very good luck.

My choice for the best all-around super-zoom available today is -- drum roll, please -- the Panasonic Lumix FZ200. This camera offer a 25mm to 600mm zoom with a constant f/2.8 aperture used wide open. This brings back memories of my beloved pro lenses.


My Fujifilm HS10 took this. The FZ200 will make it easier.
So, what claims does Panasonic make for the FZ200 that have convinced me it it the best super-zoom for me? Check out the Panasonic site for the answer. And look carefully at the posted images shot by some pros. Here is a link: The Breath of Nature Captured with FZ200.

If you are actually a working pro, the FZ200 will not replace your Nikon or Canon DSLR with assorted detachable lenses, but if you are anything less, say a reporter, I'd give the purchase of the FZ200 a lot of thought.

There are reviews on the Web of the FZ200. But in my experience, what is important is not the grain that appears at IS01600, or the number of lines per mm that can be captured with the lens zoomed all the way out, what's important are the moments that can be captured. Most of us are not looking for ultimate quality and quibbling over tonal range, most of us simply want a decent shot Bruce Cockburn in concert for our scrapbook. A large aperture (f/2.8) should make this easier. I liked what I was getting before, I can't wait to see what I'm going to be able to achieve with an FZ200.


An f/2.0 aperture made capturing this moment possible. Thank you Canon S90.

Thursday, February 21, 2013

Why? What has happened to quality?

Click the image to see all the complete photo file.

Recently I was interviewed by a freelancer for one of Canada's biggest daily papers. I supplied some art for the article as requested. The above is the picture as it looked posted on the Web. I didn't see the image in the paper but I have to wonder how it reproduced in print. It sure looks poor here.

Was the photo file I moved to the paper soft and out-of-focus? I assure you, it was not. Check out the image below. This is a copy of the original transmitted to the paper, with the only difference being that I have shrunk the file for quicker loading. I am posting less quality than moved to the paper.)


Click the image to see all the complete photo file.

Which raises the question, why does the image look so poor on the paper's website? Why?

When I worked in the newspaper industry, only experienced staff touched images. I know a lot has changed at newspapers. I know reporters take pictures and photographers write stories. I'm left wondering "Who worked on my picture?" It wasn't someone with any training is my guess.

Saturday, February 9, 2013

Don't teach 'em to say cheese


Kid pictures are best if the child isn't looking at the camera and sporting one of those awful say-cheese smiles.

Get down on their level and watch for an action moment. If you have trained your children to ignore the camera, you can get in close with a wide angle and capture an intimate moment unmarred by an eyes-toward-the-camera stare complete with a foolish say-cheese grin.

Fiona had been having a ride in her sled when she realized she should share the fun. She loaded her teddy bears in the sled, grabbed the rope and trudged through the deep snow with teddys in tow. This was the picture. This is the memory moment. Keep its uniqueness intact by not injecting yourself into the moment. 

I shot this with a Canon S90 set to 28mm and fully automatic. I could have brightened the image a little more in Photoshop, see below, but I hate reopening images that I have enhanced and saved. Each time that you open 'em, change 'em and save 'em, you degrade 'em. That's the rule.

If you may reopen an enhanced image later and modify it, save it as a TIFF or another file format that does not cause image degradation with multiple openings followed by changes before saving again.


What magic did I perform in Photoshop to brighten my first image? I moved the white endpoint in Levels taking care not to lose too many highlight tones. Using Levels makes this easy. Just note the tonal graph and don't cut out too deeply or eliminate too many. Then in Curves bend the tonal curve by grabbing it near the highlight end and giving it a smooth curve along its entire length. I prefer a smooth curve. I find it makes the tonal change appear natural and not forced over what we used to call at work "over worked."

Friday, February 1, 2013

My Canon S90: should I trade it or keep it?

My granddaughter and her mom scroll through photos on mom's iPhone.
I'm wondering about a new camera. My Canon S90 was state-of-the-art when I bought it a few years ago. Today's model, the Canon S110, has dropped back in the pack; It is no longer a leader but a follower, an also ran. I understand both the Sony Cyber-shot RX100 and the Fujifilm XF1 sport better sensors, the all-important heart of a digital camera.

Plus, both the Sony and the Fuji boast zoom lenses opening to f/1.8 when used at wide angle. Very nice. The Sony seems a bit expensive, and so I am leaning toward the Fuji if I should make the jump. But, and it is a big but, my S90 is still delivering. I still get the pictures with my present camera kit. I can wait, and save. And the rumour mill has it that the next generation of my beloved camera will have the much lusted after f/1.8 lens, and maybe an improved sensor, too.

Sunday, January 6, 2013

Archive child's art with point and shoot

 
Kids make art; They crank out a constant flow of the stuff. With an innate love of the abstract, they are prolific painters in the modern style. Fiona may be no abstract expressionist, then again maybe she is, but my wife and I like to share her work. We hang it on our fridge while secretly thinking it should hang in a gallery.

Unfortunately, a piece of art faces a short, tough life mounted on our fridge door. I saved some of Fiona's best pieces, but it soon became obvious that it was going to be impossible to save every splash of colour applied to a page.

This is where the digital camera comes in. Save your child's art for posterity, or your grandchild's, using your point and shoot. With a little luck the images may have a greater life span than the pigments used to make the original art. How stable are paints found in child's art set? Will the creation fade in sunlight?

Although there are questions about digital archiving of art, I'm betting digital images will last longer than cheap paint on coarse paper.

A note about the art: Fiona used her hands to paint the flower petals. "Watch gug-ha," she said. "Using your hands makes more complex colours." The three-year-old was right. She doesn't even own a warm brown paint but she managed to use that tone to tint a petal in her painting.

Which bring us to this: There are three things to keep in mind when archiving a kid's work.

  1. Shoot a full frame picture of the work. If you ever want to make a print, you want all the subtle nuances captured in the image.
  2. Shoot a picture showing the image on display.
  3. Try and get at least one photo of the young artist with the work. A picture showing the work being painted or sketched or whatever answers this nicely.
  4. Remember to keep the light illuminating the work "clean". Soft, mid-day daylight streaming through a large window is excellent. You don't want the picture tinted orange from an old tungsten light bulb or green from being lit by fluorescents.

Monday, December 17, 2012

Shooting action with a point and shoot

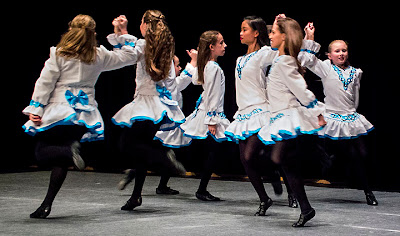
For me, the little dancer in the middle of the image  makes the picture.
I think of my Fuji FinePix HS10 as a glorified point and shoot. It appears, at first glance, to be small version of a DSLR but it is more illusion that fact. Oh, it has some nice features, I love the manually controlled zoom. It works just like my professional zoom lenses from my days as a newspaper shooter. But the oh-so-slow lens is a killer — a picture killer.

If you are like me, too poor to afford a complete DSLR kit, a couple of point and shoots can work just fine but you have to make some concessions. You've got to accept that you will have a high failure rate when it comes to taking pictures under difficult conditions.

Something that most folk forget is that action is not constant. If dancing girls are hopping about a stage, there is a moment when they are neither hopping up nor down. Action stops while the direction of the action reverses. Capture this peak moment and even a slow shutter speed will yield a picture.

Capturing the peak moment is easier said than done. I find with my HS10 that if I use the continuous shooting mode I increase my chances of hitting this action-capturing sweet spot.

Link the use of the continuous shooting mode with shooting moments when action has actually stopped is an even better way of guaranteeing an image. For instance, with the dancers there was a moment at the end of every reel or jig when the girls took a pose before bounding off stage. These poses made for perfect moments for maximizing the chance of capturing a quality photo.

One nice thing about posed shots is the quality; It is good enough quality to make acceptable prints. When images are presented online, they do not need the resolution demanded by images being made into prints.

If you are sacrificing movement in order to get a good image, watch for images with other features that can give the picture visual punch. Colour is a good thing to watch for. Splashes of colour almost always add to the appearance of a picture on a page.

Shooting a dance performance, inside on a stage, can be difficult when using a point and shoot. But, it is not an impossible situation. But, if there is one dancer, a daughter or granddaughter that you simply must have in a picture, go for the posed shot.

Saturday, December 8, 2012

Use "motor drive" with your point and shoot

Firing at wide angle maximizes the f/stop in use.
 O.K., it's not quite a motor drive. But, holding the shutter button down on many point and shoots will give a continuous burst of shots at a subdued speed — more like an old fashioned camera winder than one of today's super quick motor drives. Still, even a humble winder has its place.

My Canon S90 (the Canon S110 is the replacement) has an f/2.0 lens when used wide open. This demands shooting at wide angle. As the lens is zoomed it loses maximum aperture size. Shooting at wide open with the lens at wide angle, set the camera to available light photography. You want natural looking images taken without a flash. Most folk prefer the look of available light over harsh on-camera flash.

The school gymnasium where my granddaughter's Christmas pageant was held was somewhat dark, at least for photography. The shutter delay on my point and shoot struggled to focus and this meant lost pictures.

In situations like this I have found waiting for picture moments and then simply laying on the shutter button works wonders. Line up your shot, or anticipated shot, and then when the moment is right start firing. With luck you will grab an image with minimal subject movement. (I know you will hold the camera steady and keep camera movement to a minimum, right?)

As this was a picture moment, the potential for capturing a good image is there. Unfortunately, the slow shutter speed necessitated by the available light approach dooms many of the images. But, with my system you will have choices and a few of those choices may be just what the (photo) doctor ordered.

Points to remember:

  • Wait for a picture moment.
  • Shoot at wide angle to maximize the f/stop in use.
  • Keep the shutter button depressed to fire off a series of shots.
  • Hold the camera steady. If possible, brace the camera. 
  • Use a very large SD card. You don't want to fill your card during your shoot.
  • View your pictures at the soonest possible moment; Enlarge the best ones to ensure you've got your picture.

Wednesday, September 26, 2012

Not quite a silhouette


Not enough light? Before turning to your on-camera flash, consider shooting a silhouette or even simply shooting an image that is darker than your usual.

I "printed" this with the background a little darker than in the original file. Now that I am viewing the image on a "page," I am not completely pleased with my work.

I think the image would have more punch if the back lit pink crown was more blown out and the pink fairy wing were brighter. The second image is posted below. What do you think?


Saturday, September 1, 2012

Forced to use slow shutter speed, panning offered solution

Panning can capture subject movement.
Recently I visited Montreal, and while there I visited the Biodome. The exhibit made the news recently with the survival of a baby lynx, one of three, born to a captive Lynx that calls the dome home.

It's seems bright enough in the dome until one tries to take a picture of a moving lynx. Today's slow lenses in our point and shoot cameras have very small f/stops even when used wide open. These lenses demand the use of very slow shutter speeds in dimly lit indoor situations. A slow shutter speed, as you know, will not stop action. A blurry image is the result.

Panning is one way to squeeze an image out of a situation like this. Focus on the moving subject and pan, follow the subject with the camera. Squeeze off your shots carefully trying not to jar the camera. With luck, the feet and legs will be rendered as moving blurs of motion while other parts of the subject, such as the head in this case, are captured with an acceptable amount of sharpness.

My shot of the lynx was shot at 1/10th second at f/5.6 using and ISO of 800. I think it works. Sadly, I'm not sure the Biodome works for the lynx. The mother's constant pacing suggests stress.

Other animals in the Biodome environment looked quite happy. They were content. But I did not get a feeling of contentment and happiness from the clearly agitated lynx.

Wednesday, August 22, 2012

Little story additions make a big difference

Click on image to see expanded view.
What makes one picture better than an other? Clearly colour, composition, subject matter and quality of the image all enter into the equation. One often ignored quality is story telling. The richer the story told, the better the picture.

I've shot a lot of pictures of bees but I have never been able to show the pollen carrying sack as clearly as I did with today's image. For me the burst of colour, the placement of the bee, the clarity of the image and the story-telling mass of pollen carried on this bee's leg all work to make this one of my best bee images ever.

Monday, July 23, 2012

Photoshop or soft focus filter? Which is best?

The unsoftened image can be found here.

Back in the days that I shot film for the local newspaper, I played around with soft focus images. Soft focus does not mean out-of-focus. A true soft focus image is a blend of sharp image and a soft one. Soft focus images glow, the highlights may bleed into the surroundings, but these images have a sharpness that gives them the punch missing from simple blurry shots.

Some photographers used to try and produce the soft focus effect in the darkroom. This method didn't work well. One works with a negative in the darkroom with the result that the shadows bled into the highlights. For instance, bright teeth (high key areas in an image) were darkened by the bleeding of colour or tone from the surrounding areas.

I found that a Nikon Soft Focus No. 1 filter screwed onto the front of a lens worked best. These filters were perfectly clear with a pattern of diffusing dots scattered over the filter surface. The result was a Nikon sharp image with a soft glow. It was a very nice effect.

Now that I am shooting digital, I thought I'd like to try recreating the soft focus effect using Photoshop. I searched the web for ideas and tried a lot. They all, for one reason or another, failed to deliver the look I was searching for.

Then I found one site that had a method that was pretty good. I felt it produced a fine look that one could confuse, if one didn't look too closely, with the results achieved using the old Nikon filter.

Not one to rip off another blogger, here is link to the site with the soft focus effect instructions. Enjoy.

Link --- Soft-Focus Emulation in Photoshop

Monday, July 9, 2012

Kaleidoscopes for pictures with a '60s feel


Photography is about fun. Kaleidoscopes are about fun. When I found one of the cardboard toys in my basement on the weekend I immediately wondered what would happen if I tried to shoot pictures using the old thing.

When playing with stuff like this remember to try different lenses. For instance, I found that I got the results I was looking for with the kaleidoscope when using my lens zoomed to 105mm. The wide angle rendered an image trapped in a black circle. If you can control the f/stop, play with this, too.

The toy of the psychedelic generation pumped out some really neat shots. I learned that if you have an iPhone, there is an app for taking pictures that emulate my kaleidoscope. Check out Kooleido for your iPhone, if interested.

And of course, there is always Photoshop. For high quality results, Photoshop may be the best answer. Start with a fine quality image and let the software take it from there.

Still, there is something cool about using the real thing. It's a fun blast from the past.

Sunday, July 8, 2012

34-month-old shooter

Smile grampa Bill.
 
Fiona is only 34-months-old, but that is old enough to start learning how to handle a camera in my book. She has taken so many pictures with my Canon S90 she now calls it her black camera.

Only 34-months-old, Fiona loves cameras.
Last night she wanted to take a picture with her camera. I gave Fiona the Canon and warned her to keep her fingers off the lens. Her other grandfather started hamming for the camera and the little kid had a subject.We watched as she composed her picture and snap. She had her shot.

My Canon is a pretty solid camera but I watch Fiona very carefully when she is playing photographer. I think the risk is worth it. I hope it teaches her a little responsibility.

I also hope it helps her develop her photographic skills. She seems to have potential.

Sunday, July 1, 2012

Shooting those ceremonial moments


Personally, I like the "moment captured" type of photo but often folk want a traditional "smile for the camera" picture. This is often the case when shooting events: weddings, baptisms, retirements, and the like.

When it comes to these pictures, you should have an edge over the hired professional shooter. You know the subjects. You are a friend. Getting a good, warm smile should be easy. Thanks to the instant feedback offered by digital cameras, you will know when you have the picture locked up. Don't stop shooting until you're happy with the picture. But, possibly break your shoot into two or more takes.

If getting the right image is difficult, don't subject your friends to the "just one more" torture. Take a break. Give your subjects a rest. Don't tell them that you are not happy with the pictures. Just move on. Later, try again without making too big a deal out of it. Keep the shoot relaxed and the good images should just flow.

Bright, contrasty sunlight mixed with shade is tough to shoot.
If you are shooting outside, look for open shade. Harsh sunlight makes for harshly lit images. In a word: ugly. Inside, look for well lit areas with clean light. Stay away from incandescents that turn subjects orange or cool lights that render folk with a ghoulish blue hue.

Lastly, watch for props. The couple above are celebrating their retirement, of that there is no question. Incorporate the prop into the picture neatly, with as little wasted space as possible. Keep your picture tight and get immediately to story at hand.

Keeping your shots tight and not requiring a lot of cropping after the fact will keep images, even from small point-and-shoots, large and detailed enough for at least an eight by ten inch print.

Monday, June 25, 2012

Tools to improve your pictures: Colour, composition, subject placement, depth of field


I would never have noticed this picture if it hadn't been for my 33-month-old granddaughter messing about with my hens and chicks. When I got down to her level, in order to get her away from my plants, I saw the view that had drawn her there.

The tall stalk is the first sign of a flower forming. The pink top is clearly the centre of interest of my picture. I carefully positioned the pointy, pink tip in front of darker, brown gap in the solid mat of hens and chicks. This hid the gap and took advantage of the contrast, making the pink tip "pop" free of the image. Try to actively position the subject of your pictures. To accomplish this, shift the camera position. Always note how the foreground relates to the background. This is important. Remember, you have a lot of control --- use it!

Using the rule of thirds, the pink tip is approximately placed at one of the intersection points. This is an example of classic placement of a centre of interest. It's a classic approach because it works.

Another trick used to attract the eye while making the subject jump out from the image is the use of a shallow depth field. The foliage in the background is gently out-of-focus. Personally, I often find it distracting when backgrounds are too far out-of-focus. I don't want to obscure what is present in the background, I just want to divert attention from the background to the foreground.

Of course, colour and tone are also used here to attract the eye. The bright pink is a natural for attracting the eye, especially when placed on a green background of just about the opposite shade on the colour wheel. The bright highlights on the edges of the developing blossom also work to attract and hold the viewer's attention.

Lastly, keeping the subject, the pink-tipped stalk, large in the image underlines the subject's importance. When composing a picture, always consider image size in the final image. Getting close to the subject, as I did, makes the subject relatively large compared to the other stuff in your image. The subject doesn't always have to be the biggest thing in your pictures. Just keep in mind that, to a great extent, you control the size of your subject through the choice of lens (wide angle or telephoto) and the shooting distance you choose when positioning the subject in front of your lens.

This is a simple picture but I like it. It captures the beauty of a spreading patch of hens and chicks --- a beauty that goes unnoticed all too often. Now, grab your camera and head out to the garden; I am.

Saturday, May 26, 2012

Be brave and save the long lens for lions


Bugs are surprising, especially in photos. Their wings are so delicate, their bodies prickly with stiff, sometimes colourful, hairs. They are just generally creatures from another place --- from a world too small to see.

When I got interested in photography taking good pictures of bugs was difficult, and it was expensive. Today all that has changed. Most point and shoot cameras have macro settings, often the icon for close-up photography is a flower, and many cameras will shift into their macro setting automatically. What could be easier?

What is left for the photographer? Answer: getting close. Try and capture a big image, one that reveals details generally hidden by the bug's small size. Bees and wasps are good subjects if you are careful and don't get them agitated. They themselves are very colourful right off the bat and then you have the colourful flowers on which they feed. Perfect.

Monday, May 21, 2012

Turning a weakness into a strength


My wife is not fond of hostas. Just a bunch of green leaves, she says. I, on the other hand, love 'em. I see colour, mostly green I grant you, but many have wonderful splashes of yellow and others sport dashes of creamy white.

I love the way the expand quickly in the spring, claiming the entire area of the garden they occupy as their own. The leaves swirl and overlap and, to me, they are as beautiful as a large, colourful flower.

When the hosta flowers appear in late summer, small purple flowers on long stems, their look is overshadowed by the plant's leaves. Still, the flowers are a nice addition to the dramatic, hosta presentation.

Capturing what I see when I look at a hosta means getting in close. It means keeping all in crisp focus. It means finding and capturing the mad swirls and twisting splashes of colour.

And this is a job than can be handled with aplomb by almost any point-and-shoot. I used my Canon S90 but I can't think of a PAS camera that wouldn't rally to this challenge. It is not just the aperture, the f/stop, that governs depth of field, deep focus in an image, it is the size of the sensor.

35mm cameras had more depth of field than their large two and a quarter brethren. Today's digital PAS cameras have even more depth of field than their 35mm counterparts. So much depth of field poses its own set of problems but here it is a solution and not a curse.

Sunday, May 20, 2012

Hey kid, time for lesson No. 2


Fiona has a hard time using my little camera. She gets her fingers in front of the lens, or worse she gets those smudgy fingers right on the glass. Holding the camera steady is a whole other problem.

I have a problem, too: Patience. I tend to run a little low on the stuff when she's got my Canon S90 --- a camera she has taken to calling her camera.

Seeing a purple flower, she wanted to use "her" camera. I had to remind her to keep her fingers off the lens. I had to tell he not to get too close. The camera can't focus when you get in too tight. To which she asked, "What's focus?"

She took picture after disappointing picture. I kept encouraging her. She could see she had missed the shot from viewing the image on the back of the camera. But I could see the back of the camera as she c composed her shot. I could tell her to raise the camera or lower it. I admit to helping her crop the final picture of the flower that she so desperately wanted to capture photographically.

Thanks to bright sunlight, usually the bane of photography, she had lots of depth of field and a quick shutter speed to stop the camera wobble. She doesn't have the steadiest of grips.

It was tough, on both of us, but I think it was worth it. The little girl got her shot of the purple flower.

Now, if you've got some little ones in your life, give some thought to letting them use your camera. It is not a toy. This is not just play. But, this is fun. Stay close, don't let them abuse the camera --- on purpose or by accident -- work with them so they can share their view of the world with others.

Good luck!

Tuesday, April 24, 2012

Lesson No. 1, kid.

Get your fingers off the lens, kid.
Years ago I wrote a photography column for The London Free Press. One column encouraged readers to let their children use the family camera. Watch them carefully, I said, don't let them drop the thing. To prove that kids could be trusted, I borrowed a friend's five-year-old and headed off to a local park.

After breakfast can I take some pictures.
The little one did quite well. In fact, for years I used her picture of a number of swimming water birds to shame grad students at Western into applying themselves at photography.

My granddaughter is almost 32-months-old and I'm thinking it is time to hand her the camera. She agrees. We go for walks and she sees stuff that interests her. Pointing this stuff out, she tells me, "Get out the camera. That makes a picture!"

Rather than take orders from a toddler, I'm giving her the camera. Heck, she is always saying, "I want to do it myself." I've decided, "O.K. kid, do it yourself."

I say, you're never too young to learn to keep your fingers off the camera lens. That'll be lesson number one.

Sunday, April 22, 2012

Be Prepared

The fast f/2.0 lens of my Canon SD90 comes through again.
Little Eloise has wonderful skin: Blemish free and a healthy, rosy hue.

Sitting in her car seat with her purple Teddy bear Violet, the lighting in our hallway entrance was perfect. It was soft but directional and clean. The colour temperature could not have been better. All that was needed was a catch light in her eyes.

I took a few shots in case she never did look up. I didn't want to come away with no picture at all. But, I was in luck, she glanced upwards and "Snap!" I had the picture.

Learn to watch the light illuminating your subject; Anticipate future action. Photographers are wise to apply the motto of the Boy Scouts: "Be prepared."