Monday, October 18, 2010

Photoshop: a fast fix

Credit: Photo Illustration by Rockinon
I do a little reporting for an online citizen-reporter driven newspaper called the Digital Journal. Writing for DJ is good practice for someone who's still thinks he may someday be a reporter/photographer.

Today I was asked to write a piece on a report by an influential research group. The report recommended opening the Canadian telecom industry to foreign investment. My story, Canada's telecom industry needs foreign participation, needed some art and it had to be ready in minutes.

I took my cell phone, turned it off and on so that the Bell name was momentarily displayed, and took two quick pictures. The exposure setting for the first picture captured the cell phone screen and the Bell name. The second exposure overexposed the screen but captured a fair picture of the cell phone itself.

I took the two images into Photoshop and selected the screen showing the Bell name from the one image and pasted it on top of the second image. In levels I viewed both layers but only activated the one with the screen and the Bell name. Using skew I distorted the screen to overlap the blank screen in the second image. The handles are found in each corner of the selection. When I was happy with the results, they weren't perfect but they would do to illustrate a news article, I merged the layers and saved the image.

Tuesday, October 12, 2010

How to improve your pictures: Cheat!

Mallard duck shot with a Fuji FinePix HS10 set to emulate Fujichrome.
Remember memory colours? Green grass, blue sky, flesh-tones, these are all known as memory colours. For years film manufacturers all had their own ideas on how our memories remembered these colours. When film became history, replaced by digital chips, memory colours were reworked. Today some cameras will even allow you to emulate famous films from the past.

So, if we are all in agreement that accurate-when-compared-to-reality colour is not what any of our cameras --- film or digital --- give us, are we not free to fudge our colour accuracy a little? And if you're shooting for yourself, hey, why not match the colours to your memory?

I love to punch up my highlights and anchor my pictures with a solid dark tone base. I love to smack 'em with some saturation and finally whack 'em with some sharpening. If I were submitting these images to someone for publication, I'd refrain from the above. But I am not, and so I do.

Note, the colours in today's picture. Now, those colours are the way I remember them.

Sunday, September 26, 2010

Covering a news event with a Fuji FinePix HS10

When I worked for a daily paper, I had oodles of the best gear. I had two DSLRs, three zooms lenses, and four prime lenses. My slowest lens was an f/2.8. My zooms were f/2.8 throughout their zoom range. It was wonderful.

Now, I often get by with one glorified point-and-shoot. Today I grabbed some shots from the Strength Behind the Uniform charity walk and run held in Springbank Park here in London, Ontario.

I used my HS10 on auto, plain auto and sports auto, and found that often I'd have picked a slightly different exposure but I am living with its choices. I must admit that at times Photoshop is a godsend. I'm going to spend some time soon with ACDSee to see if I can do complete image enhancement without falling back on Photoshop for such stuff as working on feathered selections.

If you are curious about my news shooter results, check out my post on London Daily Photo.

Tuesday, September 21, 2010

More than one way to shoot a scene

Whenever you shoot a picture, remember there is more than one way to shoot any scene. Why is this important? Because, some of the possible approaches can be better than others. Don't just shoot and move on. Take some time and take a number of angles, a number of views, use different lenses and at different settings.

When I saw the three boats rafted up on Lake Erie off Port Stanley, my first thought was a tight, close-up. I cranked the lens on the Fuji HS10 to its max, 720mm, and shot. I used the best frame capture mode as I like to  have choices on how a moving person is depicted. I like the composition to suggest action.


But there is more to this moment and so I shot a few more images. I especially liked the following picture, I may even like it more than my first shot. It locates the three boats clearly just off the sandy beach. One person has called the second image "romantic."


Note the crude dodging of the boats in the first image. I was going to correct this but then thought I would post it as a warning to others. Either work on only specific areas or feather selections with great boldness. Half measures can look less than half as good.

Sunday, September 19, 2010

Canon S90: More Low Light Level Shooting

I like to 'print' all my images. I very rarely just accept an image as it comes from my camera. When I noticed Fiona sitting on the floor hugging her fluffy, white seal, I grabbed my Canon S90 and set it to the low light level setting for dim lighting.

On this setting, the camera automatically treats two adjacent pixels on the sensor as one and as result the file size of the images drops from 10MB to 5MB. On the plus side, the image noise is not as high as one would expect when shooting at ISO 3200. The camera picked a shutter speed of 1/30 second and set the lens to f/4.9.
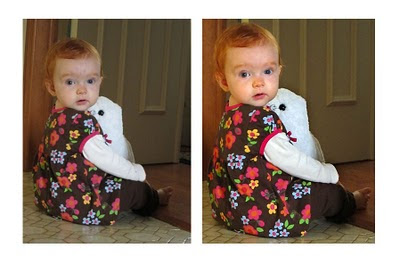
Image straight from camera on left; image after Photoshop on right. (Click to enlarge.)
I took the best image into Photoshop where I cropped it and straightened it by rotating the crop box. Next, I corrected the colour by clicking on the brightest area of Fiona's white sleeve. I determined the specific spot by going into Levels (Control-L) and while pressing the Alt key, Option on a Mac, I slid the white triangle at the right-bottom of the histogram until the black screen had a bright white speck. That white speck was the brightest white in the image. I returned the white triangle to its starting point and clicked the white area with the white eyedropper.

I then set the endpoints for the picture in Photoshop. I held the Alt key and moved the white triangle and then the black triangle. In this way, I controlled the whites that were blown and the blacks that were plugged. I find it best to blow as few whites as possible --- I try to stick to spectral highlights --- and to be a wee bit generous in the plugging of blacks. This ups the overall contrast of the image, giving it more punch.

Then, I selected Fiona's face and tweaked the endpoints of the selection using Levels and I tweaked the skin tone by going into Curves and removing a little yellow.

My last step was to resize the image for the web (7-inches deep at 72 dpi) and give it a whack of USM (Unsharp mask: Amount 160% / Radius 0.4 pixels / Threshold 3 Levels).

Was I totally happy with my Canon S90 results? No. The shutter speed the camera picked was awfully slow and this made capturing movement difficult. I could have done better with a DSLR and a very fast lens --- f/2.8 or faster.

On the other hand the S90 is always handy because of its small size and the images it does capture are quite good. I may not be totally happy with my little point-and-shoot but I still totally love it.

Monday, September 13, 2010

Get down to their level!


When shooting children and pets, getting down to their level will often yield the best pictures.

This picture of Fiona was taken with my Canon S90 on the low light level setting. This kicks up the ISO and cuts down on the expected image noise. If I had a better camera, a DSLR with a top mounted flash, I would have tried bouncing my strobe off the white ceiling rather than shooting at the higher ISO.

Without a flash, find your angle and if possible brace your camera. You face enough difficulty trying to stop the movement of the child or pet; don't add camera shake to the equation if you have a choice.

And if you are protesting and saying, "But your camera has a flash." You're right but straight on strobe is the flash of desperation and with lots of window-light I wasn't that desperate.

Thursday, September 9, 2010

Memory Colours

One often hears arguments about digital photography and how film was better. Film depicted the world in a more accurate manner, or so many people believe. Don't count me among them.

If thirty years ago you had shot the same scene with Kodachrome, Ektachrome, Agfachrome and Fujichrome, you'd have had four different renditions of the scene. As I recall from my own experience the Kodachrome would have been warm, the Ektachrome cool, the Afgachrome warm but not like the Kodachrome and the Fujichrome would have had an intense brightness of colour that would have blown away all the others.

One important place to look for the differences in the films would have been grass or foliage. The green of foliage or the blue of the sky is a memory colour. The choice of how a film renders a memory colour is important and there is an amazing difference between films, or today, between chips.

In the days of film we used to modify the colour of our printed images using filters in the printing process. Today we use Photoshop. Some days I hit my images with lots of colour as it is how I like to recall the scene. My memory colours are bright and bold like the Fuji colours of the past.