Saturday, January 22, 2011

Shooting food

See it, like it, shoot it, eat it!
I have it from a respected source that at one time photographers specializing in food photography were paid thousands of dollars for an image destined for a national magazine. When I went to art school in the '60s shooting great food pictures was an accepted art and craft.

When shooting soup, drop clear marbles into the broth we were told. These would settle to the bottom and force the vegetables, or whatever, to the surface. We were instructed to use shaving cream for whipped cream as it would hold together longer under the lights. Spraying food with glycerin to give it a "wet look" was an accepted practice. Bluntly, we were taught to cheat. But those days are gone.

Today it is very important to shoot honest food pictures. If the picture needs trickery, you may need a lawyer. This is especially true when shooting product shots for ads and the like.

So, if you like to shoot food, go for it. Take your time, pick your subjects, and you can produce pictures as good as the big shots. Today's picture shows a blueberry and cauliflower salad served on a bed a baby spinach with a fig and lemon balsamic vinegar dressing. It tasted as good as it looked.

Like so many of my food shots, this was shot in our kitchen in the seconds before sitting down to eat. It is illuminated by soft light pouring in through a large window. I admit that I chose the blue placemat for the picture but other than that this salad is just as it appeared.

My wife's the food artist. I'm the photographer. (This image could be even better if it was taken into a photo enhancement program to have the shadow at the bottom of the image lightened.)

Shooting food:
1. Use food that inspires you.
2. When starting out, keep it simple. One slice of back-lit lemon can be enough of challenge for a first picture. My favourite subjects are fresh plates of well-prepared food immediately after they have been brought to the family table.
3. Soft but directional light is often best. This light minimizes deep, dark, harsh shadows. Large windows work well but the glass cannot be tinted, as does bouncing one's flash against a white ceiling. This is where a TTL flash shows it strengths.
4. Try different lens. In tight with a wide angle gives a dramatic perspective to your image. Shooting from farther back with a long lens can make some parts of the subject 'pop' on account of the decreased depth of field. Speaking of depth of field, play with shutting down your lens and teaming this with a slow shutter speed; Often a bit of depth of field looks good with food pictures.
5. Keep the light clean to keep your colours faithful.
6. Be creative and gives this all the attention that you would give any picture.
7. With some subjects you must learn to work fast as bubbles break, froth falls and steam vapourizes and all disappear in seconds.

So work fast, shoot lots, try some different approaches and above all, "Have fun!"

Good luck!

Tuesday, January 18, 2011

There's a little reason posts are sporatic: Fiona

Both images taken with Canon S90.
For more than a year this collection of blogs enjoyed regular, almost daily, posts. This activitiy has come to a grinding halt and for that I apologize. With both of us in our early 60s, my wife and I have taken on the quite enjoyable task of babysitting a beautiful little girl, Fiona, our granddaughter.

The kid's awake!
The little tyke can be quite demanding --- in a sweet sorta way. I can't move without having Fiona following along. Working at the computer is completely out, unless I want to visit YouTube and share some videos with the kid. She loves movie trailers like the ones for Tangled or Despicable Me and music videos are always worth a look.

As you can see from today's picture, Fiona arrived asleep. I have just a few moments for an explanatory post; Judy tells me the little girl is starting to stir. I best get ready to share a banana and maybe a crushed and chopped pear with the kid.

Have a great day,
Cheers,
Rockinon!

Wednesday, January 5, 2011

Amazing. The best got better!

Fuji FinePix HS20

Fuji has announced a successor to the FinePix HS10 bridge camera: The FinePix HS20.

I loved the HS10. It wasn't perfect but then it wasn't a lot of money either. The HS10 looked like a DSLR but it was really a glorified point-and-shoot. When it came to its weaknesses, and it did have them, one had to cut this camera a bit of slack. It delivered well on its promises and to expect more would have been unfair.

Come March it is a new game and a new standard. The soon to be in stores HS20 has raised the bar on what to expect from a DSLR wannabe. It promises more, lots more, and my guess is that it delivers.

The bar is now so high that there will be times when owners of bigger, bulkier DSLRs, complete with a bag of lenses, will wish they had the new Fuji.

Shot with the HS10. The new HS20 promises to be even better.
The following is from the Fuji press release and will be updated later. Or just click over to Digital Photography Review for their excellent look at the upgrade to my much loved HS10.

High Speed and Sensitivity
The newly developed EXR Processor and EXR-CMOS sensor in the HS20EXR allow for pristine images to be taken in fast-shooting situations or in low-light environments. The combination of the two technologies creates a fast transfer circuit for quick process and reading of files for high speed shooting and Full HD movies, and the EXR-CMOS sensor itself, where the wiring layer and photo diodes are reversed, creates higher sensitivity for taking impressive images in low light conditions.

Intelligent Processor
With the improved intelligent processor, taking photos can’t get much easier. The GUI, with its new rich user interface that dramatically improves the appearance and searching functions of menus, might be one of the first things you notice, but the most notable benefits are speed and image quality. Additionally, the FinePix HS20EXR can now recognize an impressive 27 scenes. While shooting, the camera configures each scene and recognizes the perfect setting and automatically takes the best quality picture, with a single touch of a button.

Click on photo to view HS10 image quality.
EXR Technology
The EXR technology adds further versatility by modifying its behavior according to the lighting condition. Users can either let the EXR Auto mode choose the correct setting itself, or pick from three manually selected options:
High Resolution Priority – can be used when you’re after exceptional image quality.
High ISO & Low Noise Priority – can be used in low light conditions where the combination with the BSI sensor makes for superb results.
Dynamic Range Priority – takes two pictures and combines them to provide a range of up to 1600%.
With these unique sensor combinations, capturing great pictures has never been easier.

Capture Moving Subjects
The FinePix HS20EXR’s strong mix of sensor and processing technologies allows breathless action shots to be captured, and the continuous full resolution shooting at 3fps, 5fps, 8fps or 11. fps at an eight MegaPixel resolution, will make sure the action is stopped in its tracks. The FinePix HS20EXR also eliminates the need to worry about slow auto focusing or shutter lag. The new solution’s contrast Auto Focus system takes approximately 0.16 seconds (minimum) to focus.

A long lens can make the impossible shot possible.
A 30x Zoom Lens
With a 30x zoom range covering focal lengths from a super-wide 24-720mm (35mm equivalent), the FinePix HS20EXR is ready for anything. Boasting high quality FUJINON optics, the manual zoom lens is now even easier to operate thanks to a reduction in the size of the flashgun. Zooming through the range can be done quickly and precisely to ensure perfect framing for every shot.

The FinePix HS20EXR also is equipped to fight blurring, a common problem when using longer focal lengths. Dual Image Stabilization combines a mechanically stabilized CMOS sensor with high ISO sensitivities for total anti-blur protection. Together these technologies reduce the blurring effect of both handshake and subject movement to provide sharp, clean and clear results even at the longest zoom settings or in challenging lighting conditions.

HD Movie Capture
The FinePix HS20EXR offers an impressive level of video functionality. With the ability to capture movies in true, full 1080p HD quality, the FinePix HS20EXR delivers high sensitivity with low noise for movies captured in low lighting. In addition, movie files (.MOV) are captured with H.264 high profile compression for smaller file sizes without sacrificing quality. With a mini-HDMI output connector, it is easy to connect and view images on your HDTV (HDMI cable not included).

High Speed Movies
Versatility is further increased thanks to the High Speed Movie options, which include capture at an incredible 320 fps. With features like this, even the fastest moving subjects can be captured and watched in slow motion.

One Touch Controls
The FinePix HS20EXR sports a full complement of sophisticated manual and semi-automatic shooting modes and photographic controls. The extensive external controls give the more advanced photographer direct access to virtually every control they will need for uninterrupted shooting, and the specially designed chassis includes dedicated command buttons for quick and easy key functions such as ISO, white balance, focus and metering. The large command dial, manual focus ring, twist and zoom lens barrel, bright, clear electronic viewfinder, high quality tilting LCD screen and deep hand grip ensures the camera handles well. AA batteries (ships with alkaline) provide excellent performance (up to 300 shots with Alkaline batteries) combined with the convenience of a universally available format when shooting for extended periods away from main power.

The FinePix HS20EXR also offers these additional features:

RAW / RAW+JPEG Shooting: The FinePix HS20 has the ability to shoot both a RAW and JPEG shot simultaneously. RAW is for ultimate quality shots via post processing, JPEG is for great quality with no need for further post-production work.

Motion Panorama 360°: The sensor extends the sweep range to 360˚ (shots can also be taken vertically). Combined with high quality Fujifilm printing, sweeping and impressive scenes can be taken, showing fine detail, low noise and high resolution at 180°, 240˚ or full 360˚ panoramic ranges.

Purple Fringing Reducer/Corner Resolution Enhancer: The EXR processor has the capability to spot and reduce purple color fringing, most common on dark subjects against light backgrounds. In addition, the EXR processor improves the resolution at the corners of an image for more uniform image sharpness.

Super Intelligent Flash: The FinePix HS20EXR offers a flash control system which efficiently controls the level of flash for a given exposure to produce beautifully balanced flash illumination across the foreground and background. Super Intelligent Flash is most useful in macro photography where the contrast between subject and background can be especially challenging, but is also effective for night and backlit photography.

Multi-Bracketing: The FinePix HS20EXR has 3 bracketing functions useful for high level photography: Film Simulation Bracketing (which automatically sets Film Simulation to PROVIA, Velvia and ASTIA for simultaneous capture of 3 frames), Dynamic Range Bracketing (which automatically sets dynamic range to 100%, 200% and 400% for simultaneous capture of 3 frames) and AE Bracketing (which automatically sets exposure range to even, under and over for simultaneous capture of 3 frames).

Face Recognition: Users can register up to eight (8) faces, along with names, birthdays and categories, and the HS20EXR will prioritize focus and exposure right on the faces of those special people. Users can also use Image Search to view images of a registered person.

Face Detection and Automatic Red-eye Removal: To provide perfectly exposed and focused portrait shots, the FinePix HS20EXR is fitted with Fujifilm’s latest Face Detection technology which is able to track up to 10 faces simultaneously, at almost any angle to the camera. The system instantly corrects red-eye and then saves both the original and the corrected image file automatically.

PhotoBook Assist: PhotoBook Assist lets you select and organize images in your camera to create a digital photo book. You can download the photo books to your computer using MyFinePix Studio software that is included.

Pricing and Availability
The FinePix HS20EXR will all be available in late March 2011 and will be priced at $499.95.

NOTE: For complete camera specifications, please go to: http://www.fujifilm.com/products/digital_cameras/

Saturday, January 1, 2011

Rescue deleted pictures

A rescued Boxing Day photo
Before I downloaded my pictures from Boxing Day, I committed an oops; I erased my SD card. "Oops!"

If this happens to you, there is a solution: Image Rescue from Lexar, the card manufacturer. This program is available for both PCs and Macs and costs but $33.99 U.S., a bargain.

I first learned of Image Rescue while working at The London Free Press. I returned from shooting some aerials and the images wouldn't download. There had been a card error. The camera had had an oops.

Image Rescue found all the images, downloaded them and placed them in a folder on my computer.

Two warnings: First, sometimes damaged images are not complete. There may be only a partial image on the card. In cases like this, complete retrieval may be impossible.

And the other caveat is that Image Rescue 4, the version that I used, does not work when a camera is used to download the images from the card in question. A USB card reader/writer is necessary. I had to buy a USB 2.0 card reader/writer as my card is designated SDHC. My older reader/writer did not work with my SDHC card. Image Rescue could not find the device until I used the USB 2.0 reader.

I picked up a USB 2.0 card reader/writer at Tiger Direct for $6.99. Another store, right across the street, was asking almost $30 for a similar reader. Don't overpay for a simple card reader.

That said, if the problem is human error, all the images should be salvageable. Just do not take any more pictures using the card in question. You do not want to overwrite any of the "erased" images.

A few years ago I took pictures in Antelope Canyon in Arizona and Walgreen's lost the images when cutting a CD. If I had stopped using the card containing the lost images, I could have salvaged the shoot. I should have bought a new card and retired the other until I got home and retrieved the lost images using Image Rescue.

Continuing to use the card was the biggest oops of all.

I should contact someone like Grey Boyer, of One Horse Studio, and buy a picture of the famous canyon. With all my own images destroyed, this is my last remaining option.

Unfortunately, with something like lost Boxing Day pictures you don't have someone with the talent of Boyer backing you up.

Saturday, December 25, 2010

Merry Christmas

Merry Christmas
and a 
Happy New Year
to all!

. . . and now to go and watch Fiona unwrap her gifts. Maybe I'll post some pictures. I do hope you are all having as wonderful a Christmas as I am. 
Cheers!

Wednesday, December 22, 2010

Fuji HS10: the good, the bad and the ugly


Shot in California, lots of luck here. This would make a good enlargement.
I have had lots of hits from folk seeking information on the Fuji HS10. Even today, well after the release of the HS30 I am attracting attention. This is an add to this post, added in mid-December of 2012. My HS10 has had a lot of knocks and falls and yet it is still taking pictures. I'm a little concerned about its health but it seems to be aging well. My most recent HS10 images can be found here: Shooting Action with a Point and Shoot.

After about two and a half years of steady use, I can honestly say I still love my Fuji HS10. Note, I said, "I love it." I did not say I like it. The love I feel for my HS10 comes at a price not measured in dollars and cents --- as if love could ever be measures in such a crass manner. You give up a certain amount of control when you use a glorified point and shoot. There are times that you're at the mercy of your camera. Thank goodness it is a merciful little thing.

Love the moment, but it is clearly soft when enlarged.
If you are a serious photographer with goals of making huge prints and even possibly selling some of your work, this Fuji may not be for you --- especially if you shoot a lot of action stuff.

That said, if you are like me --- rather challenged in the money department --- then the Fuji HS10 is worth your consideration. I don't have to make large prints. If my pictures carry on the Web, I'm happy. If my image files are good enough to make good snap shots, I'm happy.

And when it all comes together, you can make incredibly large prints from the Fuji HS10 files and I am sure my best shots would look great published. It is just that I cannot be sure when shooting, not one hundred percent ---  especially when shooting action, that the picture being taken will be up to snuff.

The colour is off but I love the moment. It's a good file.
When I was a working pro, this was not good enough. My Canon EOS was expected to be perfect --- and it was. But it cost thousands, and that was without a lens. The bag of zooms I carried added more thousands to the cost of my kit and added lots of weight. The cost of camera bodies has come down but the cost of the lenses is still high, although if one opts for lesser quality lenses one can get by.

In other words, the choice isn't as clear cut as it once was. The spread in dollars is no longer as great but neither is the spread in quality.

In the end, I don't have the money.My back is failing. I don't have the health. But my shooting eye is as good as ever and I my love of photography as strong. My Fuji HS10 brings me great joy without being a burden.

I still shoot news, now for the Web. The Fuji delivers.
If I was just starting out in photography, if I wanted a good, little camera to learn about the art, if not the craft, of photography, I'd buy a Fuji HS10. Because this camera is essentially a point-and-shoot, much of the craft is handled by the camera. The art is up to you.

p.s. My Fuji has fallen at least three times. Once, it fell far enough, and hard enough, to scratch the viewing screen on the back. (I said, I was getting old.) Unlike me, the little camera has taken it all in stride, showing no signs of slowing down.

But I do try and take care of my little friend. I have a clear filter on the lens made especially for protecting the lens on a digital camera.

See it; Shoot it. I love my little Fuji HS10.

Google "Rockin' on: Photography" Fuji and check out some of the other pictures taken by this little camera and posted here.

So remember, this is an amateur camera and not a professional one. It suffers from shutter lag, and has some trouble with follow focus but it has a zoom that works just like the ones on the cameras owned by the big boys. If you shoot for the Web, this is a camera worth considering.

Sunday, December 19, 2010

We still need the "darkroom"

Almost all pictures can be helped by a little Photoshop.
More and more newspapers are having their reporters take pictures. That's O.K. That's right, I think it is about time reporters shot some of their own art. Today's cameras make shooting a quick head and shoulders or a fast shot of a crumpled fender easy. I say free up the photogs for the stuff that requires a skillful photographer.

Just because reporters are now also shooters does not mean the paper can get by without trained photographers. Unfortunately, the folk in charge of today's newspaper chains can't see past the bottom line. If they could, they would still have lab staff. With the wet darkroom gone, these bean-counters let all the lab staff go.

And along with all the folk they showed the door, they also moved a lot of concern with picture quality out of the newsroom. Don't follow the lead of the newspaper folk. Set up a darkroom, an electronic darkroom, and "print" your pictures.

At a minimum, this photo needed white and black points set.
I use Photoshop. But I have played with Adobe Elements and Adobe Lightroom and found them very good for the price. On vacation, caught without Photoshop loaded on my laptop, I resorted to using ACDSee to enhance my images.

Compare today's two pictures. The top picture has been "printed" in the electronic darkroom (Photoshop). The bottom picture is just as it came from the camera. The difference is not always this dramatic but almost all images benefit from some "printing."

And now you know why, if your paper is like The London Free Press, why the images in your paper are occasionally so poor.

Addendum: I noticed that this post was hit by someone at The London Free Press. So, I quickly found an image shot by a reporter, John Miner.

In the old days a picture shot by a reporter was printed by the lab staff. When the lab staff was let go, the duty fell to the photographers. Now, with the photo staff severely chopped and under great strain, I'm not sure who enhances the pictures shot by reporters. From the looks of this example, the answer is no one.

John Miner's a bright guy, very talented. There are some nice things about his shot. The movement, the one foot off the ground and the other lifted. The flying snow. But the image is presented to the reader in a very poor manner. The picture says: "We don't care about quality."

I am not suggesting that John Miner or the photo staff should enhance this image. This could be done by the modern equivalent of the old lab staff and this would free photographers for shooting and free reporters for reporting. Both should be encouraged to be two-way people but with reporters the emphasis would be on the writing and with photographers on the art.

That said, if papers were using their staff wisely, they would be amazed at the untapped talent in their newsrooms. For instance, one photographer at The Free Press started out in a journalism course. Originally, this fine shooter wanted to be a reporter. As a double-threat person, a two-way person, this photographer would do a superb job if given the chance, and the time to do it right.

As I was saying, almost all images can benefit from a trip to the "darkroom."


Sunday, December 12, 2010

Best point and shoot

O.K. I don't know what THE best point and shoot is. I don't know you, nor do I know all your needs. But the following are three suggestions as to great little point and shoots that in the right hands will keep a photographer busy capturing life's important moments.

Love that f/2.0 wide angle.
My first suggestion is actually two suggestions: either a Canon S95 or a Panasonic Lumix-DMC LX5. I own the Canon S90 and I am quite satisfied; It does what I expected. This means it is not perfect but it answers my needs.

My first need is a fast lens. In most cases, I do not like straight on flash photography. All too often, for 1/1000th's of a second you destroy the light and the shadow that drew your eye in the first place, and replaced that with harsh, straight on strobe.

Both the S95 and the LX5 have very fast, for point-and-shoots, lenses. At wide angle both can be opened to a maximum aperture of f/2.0. Nice.

Team a fast lens with a big chip and you have set the stage for a camera that can shoot usable images at ridiculously high ISO settings. Both cameras, I believe, top out at 12,500 ISO! If you think that's crazy, you're right. Images shot at such a high setting suffer, but they are usable.

Owning the Canon S95 has been a delight. The shutter lag is noticeable to me, but then I used a DSLR for many years with absolutely no shutter lag. If you prefocus the camera by depressing the shutter button half way, the shutter lag is maybe a fifth of a second.

A small camera is always handy. My Canon S90 is rarely far away.
 The Lumix LX5 seems to be Panasonic's answer to the Canon S95. And, although I haven't used an LX5, the specs and the reviews indicate that it is a fine response indeed. If size is all important, the smaller Canon wins. With a slightly longer lens, the Canon may again be your choice. But the Panasonic sports an 24mm wide lens rather than the Canon's 28mm, the chip in the Panasonic is slightly bigger and the LX5 has a lot of other nice bells and whistles to keep those with technological savvy more than happy. Check out the comparison of these two point-and-shoots on Snapsort.

Let me end this with some info from Dana Wollman's recent article in the Huffington Post. Note how Wollman starts right out by accenting the S95's small size when declaring the Canon the best point-and-shoot.

Pros: About as compact as a deck of cards, the S95 looks like any other point-and-shoot, but its photos are lovely enough that even people used to carrying bulkier, more advanced digital SLRs will be impressed. Although it's the same size as other cameras, the body feels particularly solid, well-made.

This camera from Canon Inc. has an unusually large sensor for a small camera, which means clearer, sharper pictures, especially in low light. It takes generally beautiful shots and does a better job of blurring the background than other point-and-shoots. The camera also shoots HD video (1280 x 720) and has an HDMI port, enabling people to connect the camera directly to a high-definition television. Serious photographers looking for a lighter camera will enjoy the various manual controls.

Under low light levels, the Canon S90 sings.
Cons: The S95's battery life is relatively short: Canon says it can take up to 200 photos on a charge, whereas competing models such as the Panasonic Lumix-DMC LX5 ($399) claim to take up to 400. The shutter button is small. Also, the S95's 3.8X optical zoom – about what you'd get on a $99 camera – might be too shallow for some people.

Let me add, the short zoom criticism also holds for the Panasonic LX5. And one should never leave home without a second, charged, spare battery. Never! I spent almost six weeks traveling across North America last summer and not once did I miss a picture because of a dead battery.

Since relatively short zooms may not answer all your needs, I know they don't for me. That is why I also own the Fuji HS10.

I love that little camera but note I said love and not like. It has some, what my wife would call, idiocrazicies. The time lag is truly annoying but when that little camera with its incredible zoom delivers, all is right with the world. There is a clunker of a work-around for the shutter lag problem and I've learned to rely on it but it is still a clumsy work-around. I talked about this in length here: Best Frame Capture.

A long lens is sometimes one's biggest need. Think Fuji HS10.
Of course, since buying my Fuji HS10 other camera makers have put out competing models. Still, all things considered, I remain happy with my HS10 and can't see dumping it in the foreseeable future.

You may have noticed one common thread here: Size. I carried a "door stop" camera for years for work. I don't want to lug a monster camera and bag of lenses in my retirement.

In the end, if you do your homework, you will love the camera you buy and you will make beautiful pictures together.

And if you want the 'marriage' to work, don't have a wandering eye. Lust destroys relationships.

Find the bright, clean light

Shot with my Canon S90. S95 is latest version.
My home is poorly lit. I'm green. No, I'm not a leprechaun. I'm an aging environmentalist.

This means that when I shoot pictures inside my home at night, I have a problem. I hate flashes. They destroy the ambiance, the light and the shadow that made the picture worth taking in the first place. Bit when I push  my cameras to high ISO ratings, even my Canon S90, I get a lot of noise. Not good.

The answer, if one has a camera with an external flash, is to use the external flash and bounce the light against the low, white ceiling. If you don't have such a camera, or don't have an external flash, you're almost snookered.

The only answer is to search the home for any small brightly lit patches and maybe one will be suitable for photography. I searched and I found one spot - my kitchen. The florescent lights are bright and daylight balanced. I encourage Fiona to play in the kitchen and when she does something picture-worthy, I capture it.

This attitude of watching for light that does the job, light that answers your photographic needs, is very important. Learn to watch the light and work with it. And if the light is wrong, if it is outside, one can wait. Remember, you have some control over when and where you take your pictures. Keep your options open.

Thursday, December 2, 2010

Telling a photo story.

Canon S90 set to automatic and hand-held. Image enhanced in Photoshop.
London, Ontario, has a great ice pad at Storybook Gardens. The rink is scheduled to open this coming Sunday and staff are hustling to prepare a proper ice surface. The weather is cooperating, its cold, and workers are spraying the cold concrete with water.

Shot at dusk and the sky darkened in Photoshop.
But the beauty of the Storybook Gardens rink is not just its size, it's an almost kilometer long loops filled with gentle curves. The rink is situated in a park dedicated to well-known storybook characters and stories. Kids can find Humpty Dumpty in the park, and the Old Shoe that served as a home for the old lady and her brood, and more. In winter, Christmas lights add to the atmosphere.

It is a cool spot and recently I had the chance to get some images of the park prior to its opening.

The trick here is to try and tell a story. Clearly the watering of the ice pad is a core image. For this you must set some clear goals: The water spray must be backlit to make it pop in the dark, the pavement must be wet with puddles to reflect the colourful lighting, and the large size of the pad and its curved shape must be clear. Shooting at dusk makes this all just a little easier. The shutter speed is faster. Still, bracing the camera on any solid, suitable surface is an excellent idea.

The Christmas lighting must feature in at least one shot. The outline of a steam locomotive was the obvious shot but it was important to include of the curving ice trail in the picture. This photo essay is about a location and we must work to locate each picture, where possible.

After getting permission, I shot the train lights from behind. Note the rink.
I have often heard folk complain about the poor focus of their point-and-shoots. This can be a problem, I must admit. That said, I use point and shoots as I can't afford better. (I'm retired.) One trick that will work with almost all cameras is to aim the camera at whatever must be in focus, partially depress the shutter release (this causes most cameras to focus), and then with the release kept depressed you recompose your image and shoot. With today's oh-so-smart cameras you may have to watch the on-screen focus indicators to be sure that both you and the camera agree on what should be in focus.

Remember to shoot lots. This is especially true if you are shooting for the Web. You are not constrained by a finite expanse of paper on the Web, so take advantage of this fact. The rink can be seen behind the Christmas lighting locomotive but it is not especially clear. Punch up your photo story with one good image of the rink.

Photoshop is expensive. I own a copy because I am an ex-teacher and ex-photojournalist. At the least consider buying a program like Photoshop Elements to punch up you images before "publishing" your images on the Web. I like to think of this as electronically printing my pictures. Photoshop is my electronic darkroom.

Action's important.
Lastly, if you have any pictures in your files to round out your photo story, now is the time to dust off one or more of those images. Voila! You've told your story.


Oh, one last thing: Simple news pictures do not require model releases before publication. Even so, I often speak to the people in my images and make sure that they do not object to being in one of my online publications. If someone were to object, I would remove their image without argument.

To see how this approach worked with the same pictures presented on a different site, read my article on photostories posted on Digital Journal.

Tuesday, November 23, 2010

Soft focus? Sharpen 'em and keep 'em small.

Fiona's mom painted the picture behind the little girl back when mom was but a little girl. I was holding the baby but managed to get off one quick shot. The painting was in focus but the baby was soft and the whole image was very yellow from the hallway lighting.

The original file was quite yellow and Fiona was soft.
I set white on Fiona's shoulder, then selected Fiona and sharpened just Fiona using Unsharp Mask. I admit to cranking it up quite high. Almost to the max.

Then I reduced the image for the Web and sharpened the whole image with just a small touch of USM.

Sunday, November 14, 2010

Surrounded by art


We are surrounded with art. Patterns often result when our stuff is factory made. And with plastics everywhere, colours are everywhere.

A fun game, and one that teaches one to see photographically, is to look for a picture somewhere in the immediate vicinity. When I decided to play, I was in our kitchen.

I played the game recently and the result is today's picture: A lettuce washer/spinner. It has a translucent, blue plastic top with a white plastic shape inside. I noticed the top sitting in the dish rack, back lit by sunlight entering the room through the dining-nook window.

Now, look around and find a picture. You do have your camera handy, don't you? If not, for shame.

Thursday, November 4, 2010

Sequencial shots can rival video


I like video. I like being able to not only see but to hear what's happening. I have shot some quick videos of my granddaughter that I simply love. It is wonderful to have captured her little laugh for eternity.

That said, often I do not have the time to watch (or show) a video but I want to see (or show) more than just one quick, shot. At times like this, one option is the photo sequence.

You can't always be showing your cornered friends and work cronies little videos of your daughter, or in my case granddaughter. Watching videos takes time, and time is often in short supply. But, few folk will balk at spending a moment checking out your latest little sequence.


Blogger technical note:

I have linked and embedded two videos in this post. Linking was done by simply clicking the link icon in Blogger. Embedding was just about as easy. It required nothing more than finding the video in YouTube, clicking "Share" and then selecting the "Blogger" tab. If you have more than one blog, make sure you are sending the video to the correct blog. The video will appear in a new post. To move the video to another post, simply copy and paste the HTML code into the new location.

Wednesday, October 27, 2010

Shoot available


When I first got into the photojournalism game, my boss accompanied me on my first assignment to show me the ropes. Seems a little boy had found an injured squirrel and had nursed it back to health. The paper wanted a picture of the kid with his somewhat wild pet.

When we got to the home the little guy was quite excited and ran for his squirrel. With the squirrel perched on his arm, the little boy waited impatiently to have his picture taken. I shot a few available light shots with my Pentax Spotmatic to kill time as my boss set up two lights. He insisted on the highest quality for the images destined for the paper. Always use two lights, he said, and a 120 Rolleiflex camera.

As he worked the little boy's smile sagged and the squirrel began getting antsy.

With everything in place, my boss started the shoot. Snap! WHOOMP! The two flashes fired. The little boy closed his eyes and the squirrel headed for a place unknown, not to be seen again, at least not until after we left.

When we got back to the paper, my boss's one and only picture, shall we say, sucked --- big time. My available light picture ran in the paper. I never touched the Rolleiflex and I rarely used two lights. One of the other photographer taught me to use bounce flash instead.

Today, I still try to shoot available as much as possible. Today's picture was shot at f/2.5, at 1/80th second at an ISO of 640 with my Canon S90 set to Lowlight automatic.

There is a large window behind me. That's important. Set the scene such that it unfolds where there is ample light. Don't make the shoot any harder than it needs to be. Think light, think time of day, think location and then sit back, camera in hand, and let serendipity take over.

Monday, October 18, 2010

Photoshop: a fast fix

Credit: Photo Illustration by Rockinon
I do a little reporting for an online citizen-reporter driven newspaper called the Digital Journal. Writing for DJ is good practice for someone who's still thinks he may someday be a reporter/photographer.

Today I was asked to write a piece on a report by an influential research group. The report recommended opening the Canadian telecom industry to foreign investment. My story, Canada's telecom industry needs foreign participation, needed some art and it had to be ready in minutes.

I took my cell phone, turned it off and on so that the Bell name was momentarily displayed, and took two quick pictures. The exposure setting for the first picture captured the cell phone screen and the Bell name. The second exposure overexposed the screen but captured a fair picture of the cell phone itself.

I took the two images into Photoshop and selected the screen showing the Bell name from the one image and pasted it on top of the second image. In levels I viewed both layers but only activated the one with the screen and the Bell name. Using skew I distorted the screen to overlap the blank screen in the second image. The handles are found in each corner of the selection. When I was happy with the results, they weren't perfect but they would do to illustrate a news article, I merged the layers and saved the image.

Tuesday, October 12, 2010

How to improve your pictures: Cheat!

Mallard duck shot with a Fuji FinePix HS10 set to emulate Fujichrome.
Remember memory colours? Green grass, blue sky, flesh-tones, these are all known as memory colours. For years film manufacturers all had their own ideas on how our memories remembered these colours. When film became history, replaced by digital chips, memory colours were reworked. Today some cameras will even allow you to emulate famous films from the past.

So, if we are all in agreement that accurate-when-compared-to-reality colour is not what any of our cameras --- film or digital --- give us, are we not free to fudge our colour accuracy a little? And if you're shooting for yourself, hey, why not match the colours to your memory?

I love to punch up my highlights and anchor my pictures with a solid dark tone base. I love to smack 'em with some saturation and finally whack 'em with some sharpening. If I were submitting these images to someone for publication, I'd refrain from the above. But I am not, and so I do.

Note, the colours in today's picture. Now, those colours are the way I remember them.

Sunday, September 26, 2010

Covering a news event with a Fuji FinePix HS10

When I worked for a daily paper, I had oodles of the best gear. I had two DSLRs, three zooms lenses, and four prime lenses. My slowest lens was an f/2.8. My zooms were f/2.8 throughout their zoom range. It was wonderful.

Now, I often get by with one glorified point-and-shoot. Today I grabbed some shots from the Strength Behind the Uniform charity walk and run held in Springbank Park here in London, Ontario.

I used my HS10 on auto, plain auto and sports auto, and found that often I'd have picked a slightly different exposure but I am living with its choices. I must admit that at times Photoshop is a godsend. I'm going to spend some time soon with ACDSee to see if I can do complete image enhancement without falling back on Photoshop for such stuff as working on feathered selections.

If you are curious about my news shooter results, check out my post on London Daily Photo.

Tuesday, September 21, 2010

More than one way to shoot a scene

Whenever you shoot a picture, remember there is more than one way to shoot any scene. Why is this important? Because, some of the possible approaches can be better than others. Don't just shoot and move on. Take some time and take a number of angles, a number of views, use different lenses and at different settings.

When I saw the three boats rafted up on Lake Erie off Port Stanley, my first thought was a tight, close-up. I cranked the lens on the Fuji HS10 to its max, 720mm, and shot. I used the best frame capture mode as I like to  have choices on how a moving person is depicted. I like the composition to suggest action.


But there is more to this moment and so I shot a few more images. I especially liked the following picture, I may even like it more than my first shot. It locates the three boats clearly just off the sandy beach. One person has called the second image "romantic."


Note the crude dodging of the boats in the first image. I was going to correct this but then thought I would post it as a warning to others. Either work on only specific areas or feather selections with great boldness. Half measures can look less than half as good.

Sunday, September 19, 2010

Canon S90: More Low Light Level Shooting

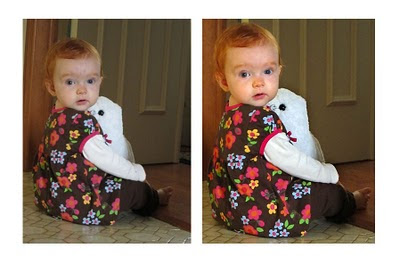
I like to 'print' all my images. I very rarely just accept an image as it comes from my camera. When I noticed Fiona sitting on the floor hugging her fluffy, white seal, I grabbed my Canon S90 and set it to the low light level setting for dim lighting.

On this setting, the camera automatically treats two adjacent pixels on the sensor as one and as result the file size of the images drops from 10MB to 5MB. On the plus side, the image noise is not as high as one would expect when shooting at ISO 3200. The camera picked a shutter speed of 1/30 second and set the lens to f/4.9.
Image straight from camera on left; image after Photoshop on right. (Click to enlarge.)
I took the best image into Photoshop where I cropped it and straightened it by rotating the crop box. Next, I corrected the colour by clicking on the brightest area of Fiona's white sleeve. I determined the specific spot by going into Levels (Control-L) and while pressing the Alt key, Option on a Mac, I slid the white triangle at the right-bottom of the histogram until the black screen had a bright white speck. That white speck was the brightest white in the image. I returned the white triangle to its starting point and clicked the white area with the white eyedropper.

I then set the endpoints for the picture in Photoshop. I held the Alt key and moved the white triangle and then the black triangle. In this way, I controlled the whites that were blown and the blacks that were plugged. I find it best to blow as few whites as possible --- I try to stick to spectral highlights --- and to be a wee bit generous in the plugging of blacks. This ups the overall contrast of the image, giving it more punch.

Then, I selected Fiona's face and tweaked the endpoints of the selection using Levels and I tweaked the skin tone by going into Curves and removing a little yellow.

My last step was to resize the image for the web (7-inches deep at 72 dpi) and give it a whack of USM (Unsharp mask: Amount 160% / Radius 0.4 pixels / Threshold 3 Levels).

Was I totally happy with my Canon S90 results? No. The shutter speed the camera picked was awfully slow and this made capturing movement difficult. I could have done better with a DSLR and a very fast lens --- f/2.8 or faster.

On the other hand the S90 is always handy because of its small size and the images it does capture are quite good. I may not be totally happy with my little point-and-shoot but I still totally love it.

Monday, September 13, 2010

Get down to their level!


When shooting children and pets, getting down to their level will often yield the best pictures.

This picture of Fiona was taken with my Canon S90 on the low light level setting. This kicks up the ISO and cuts down on the expected image noise. If I had a better camera, a DSLR with a top mounted flash, I would have tried bouncing my strobe off the white ceiling rather than shooting at the higher ISO.

Without a flash, find your angle and if possible brace your camera. You face enough difficulty trying to stop the movement of the child or pet; don't add camera shake to the equation if you have a choice.

And if you are protesting and saying, "But your camera has a flash." You're right but straight on strobe is the flash of desperation and with lots of window-light I wasn't that desperate.

Thursday, September 9, 2010

Memory Colours

One often hears arguments about digital photography and how film was better. Film depicted the world in a more accurate manner, or so many people believe. Don't count me among them.

If thirty years ago you had shot the same scene with Kodachrome, Ektachrome, Agfachrome and Fujichrome, you'd have had four different renditions of the scene. As I recall from my own experience the Kodachrome would have been warm, the Ektachrome cool, the Afgachrome warm but not like the Kodachrome and the Fujichrome would have had an intense brightness of colour that would have blown away all the others.

One important place to look for the differences in the films would have been grass or foliage. The green of foliage or the blue of the sky is a memory colour. The choice of how a film renders a memory colour is important and there is an amazing difference between films, or today, between chips.

In the days of film we used to modify the colour of our printed images using filters in the printing process. Today we use Photoshop. Some days I hit my images with lots of colour as it is how I like to recall the scene. My memory colours are bright and bold like the Fuji colours of the past.

Sunday, September 5, 2010

Best Frame Capture_A Detailed Look

Click image to enlarge and examine this ACDSee frame grab.
If you are thinking of buying a Fuji FinePix HS10 to shoot sports because you heard that it can crank out ten frames a second, think again.

I tried an experiment. I set my HS10 to the sports photography auto setting, put the camera in Best Frame capture mode, and shot some pictures of joggers. I learned a lot and a lot that I learned was not good.

I found that my camera was not good at following focus. In fact, it was poor. With fast action approaching the camera, the best images were captured immediately after depressing the shutter button. The longer the button was depressed, and the closer the subject was to my camera, and the longer the zoom in use, the more out-of-focus my results.

I am still going to try and shoot a football game this fall, but I have no illusions. It will be tough.

Click image to enlarge: Endpoints set, colour corrected, USM applied, all in Photoshop.
The Fuji Finepix HS10 can deliver the goods when it comes to sports photography but at a high cost in missed pictures. But, if like me, you do not have the money for a proper DSLR, nor the desire to carry a larger camera and all its associated lenses, the Fuji is still a good little camera.

One note: I am finding the best program for enhancing my images is Photoshop. Mostly I use Levels to set the endpoints, and curves to modify contrast and do colour corrections. Often I select areas and apply selective correction --- I think of this as similar to burning and dodging in the old wet darkroom days. For instance, I tweaked the face of the runner in the enhanced image. I always sharpen using USM (Unsharp Mask).